Index:
- Setting up local delivery
- Limiting local delivery to a certain area
- ZIP/postal codes (advanced settings)
- Limiting delivery to orders over a certain subtotal
- Limiting local delivery to certain times
- Adding delivery time picker at checkout
- Charging different delivery fees in different areas
- Delivering from multiple locations
- Managing local orders
In addition to local self pickup, you can offer local delivery to your nearby customers if you deliver goods yourself or use a local delivery service. You can make it free or charge a delivery fee as well as offer it for orders exceeding a certain amount or placed on certain days and times. To specify your local area, you can use postal codes or draw a zone on a map if you serve customers in an area that is smaller than what a postal code covers or in case you deliver only within some radius. If you have different delivery rates, just set up several local delivery options, each with its own fee and delivery area.
Setting up local delivery
To set up local delivery in your online store:
1. From your store admin, go to Shipping & Pickup.
2. At the Local delivery box click + Add delivery.
3. Depending on how you want to charge for delivery, pick one of the options and set it up:
– Free delivery – choose this option if you want to offer free delivery to your local customers.
– Conditional free delivery – choose this option if you want to offer free delivery only to those local customers whose orders exceed a certain amount, e.g. for orders over R500.
– Flat rate – choose this option if you want to charge a fixed sum for delivering orders to your local customers.
– Custom rates – this option can be used if you need to charge different delivery fees for orders within certain weight or subtotal ranges, e.g. R200 delivery of orders over 3kg and a lower delivery fee for light-weight orders.
4. Name this delivery option or keep the suggested name.
5. To limit the area where you deliver with this rate and terms, click Set delivery zone and set up your delivery zone.
6. Optional: To offer this delivery option only for orders over a certain sum, click Limit availability by order subtotal and specify the minimum order subtotal.
7. Optional: To prevent customers from placing orders with this delivery option at certain times (for example, at nights or during weekends), turn on the Set operating hours setting and customize the times for this method.
8. To allow customers to choose the delivery time at checkout, turn on the Ask for delivery date and time at checkout setting and customize delivery time settings to your needs. Turn this option off if you don’t want your customers to choose the date or time for the delivery.
9. Click Add description for customers and describe this delivery option — customers will see this information at checkout. You can include your delivery condition or your delivery time. Example: Free delivery in the central city on all R400 orders.
9. Save & Finish.
That’s it. Now customers that live within the specified area can select local delivery when they check out.
When you are ready to deliver a purchase to a customer, you can mark their order as Out for Delivery so they receive an email notification about it. Once products are received by the customer, you can change the order status to Delivered for your internal records.
Limiting local delivery to a certain area
Let’s say you deliver pizzas by bike and want to sell only to customers from your neighbourhood to keep the food warm. In this case, when setting up the local delivery, you need to specify your delivery zone, i.e. how far you will travel to deliver orders. If a customer’s address is not within the designated area, such customers can’t place orders with this delivery option.
To specify your local delivery area:
1. From your store admin, go to Shipping & Pickup.
2. Click the delivery option you want to edit or set up a new delivery option.
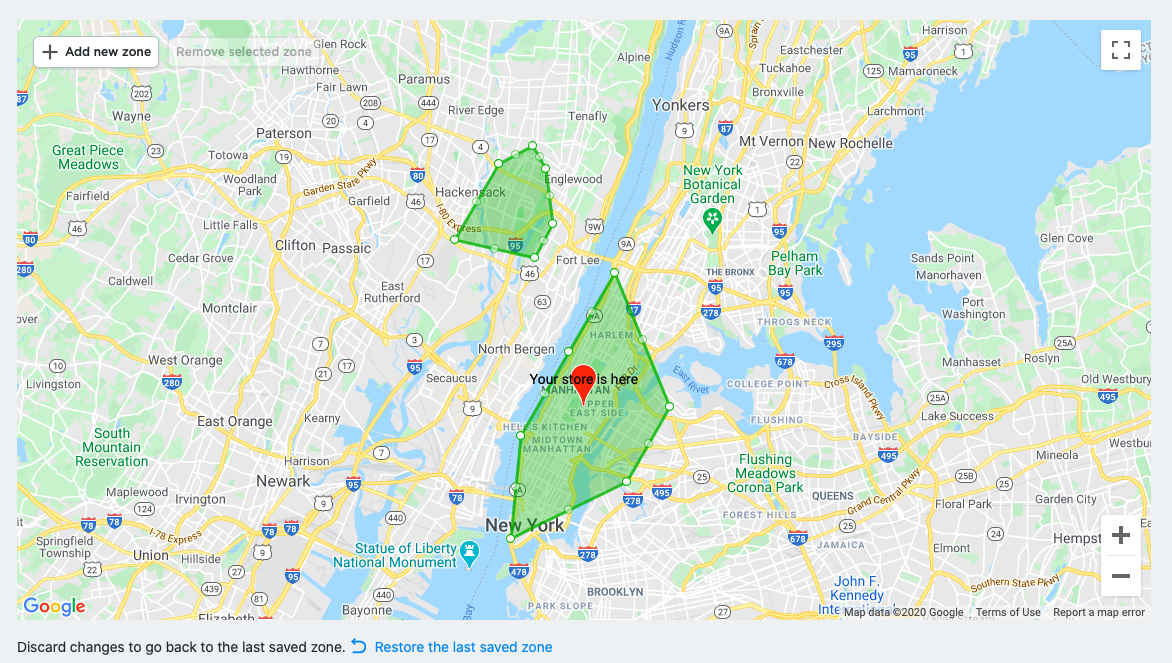
3. Scroll down to the Delivery zone block. Here you can set up the local area where you deliver by drawing a zone on a map or by entering specific ZIP/postal codes:
4. With this option, you can set up a delivery radius around your store location. For example, deliver only within a 15 kilometre radius of your pizza place.To define a zone on a map, click Create Zone and drag the circles to shape the area where you deliver. Right-click on the zone to see how far you deliver (in kilometres), this can help you calculate the average delivery time.If you want to offer the same delivery fee for several areas but exclude some addresses, you can click + Add new zone and add additional zones on the same map so that your excluded addresses are not within any zone.
Example:
If you want to charge different rates for different delivery zones, you can create several delivery options, each with its own fee and zone. See Charging different delivery fees for different areas.
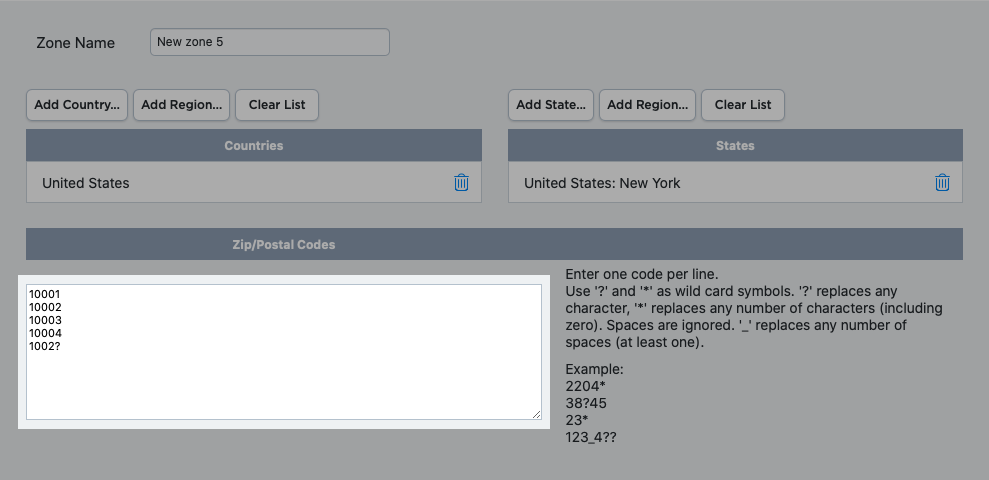
ZIP/postal codes (advanced settings)
If ZIP/postal codes cover the area where you want to deliver locally, you can specify the postcodes to define your local zone. Select Advanced settings, then click Create new zone and narrow your zone – select your country and state and enter the postal codes of your city areas where you deliver, one code per row. To keep a list compact, you can use wild card symbols. Learn more about creating zones: Adding and managing destination zones.
Example:
Save the changes.
Limiting delivery to orders over a certain subtotal
Usually a free or lower cost local delivery is offered to orders exceeding a certain amount to keep it profitable.
To offer local delivery for orders over a certain amount:
1. From your store admin, go to Shipping & Pickup.
2. Click + Add delivery.
3. In the Conditional free delivery block, click Set Up Conditions.
4. Enter the name for this delivery option.
5. Below you will see the pre-set values that mean free delivery for orders over R500 and R50 delivery for all smaller orders:
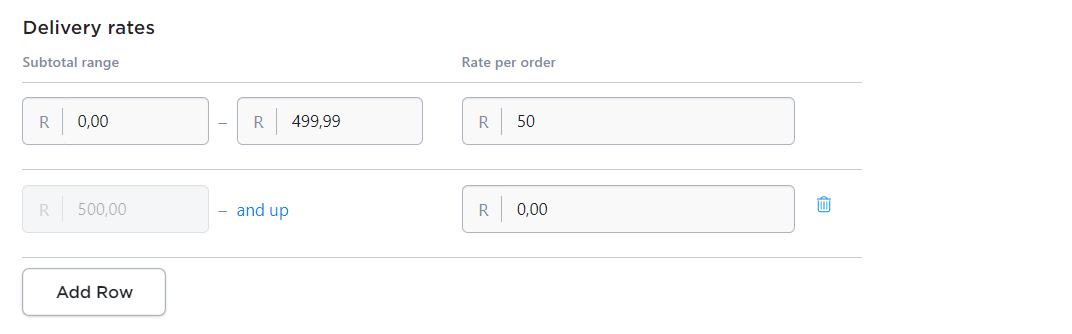
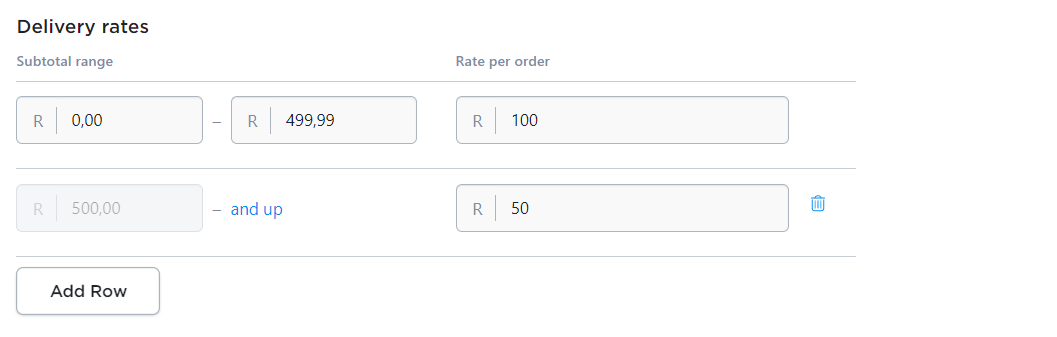
6. Enter your values instead of the suggested subtotal range and input the delivery rate that corresponds to it. Let’s say you want to charge R50 for orders over R500 and R100 for a smaller subtotal range. Enter the maximum amount for regular charge (in our case it’s R499.99) and the minimum sum for lower-cost delivery will be changed automatically:
7. Add the description for this delivery option that your customers will see at checkout such as your delivery time or conditions.
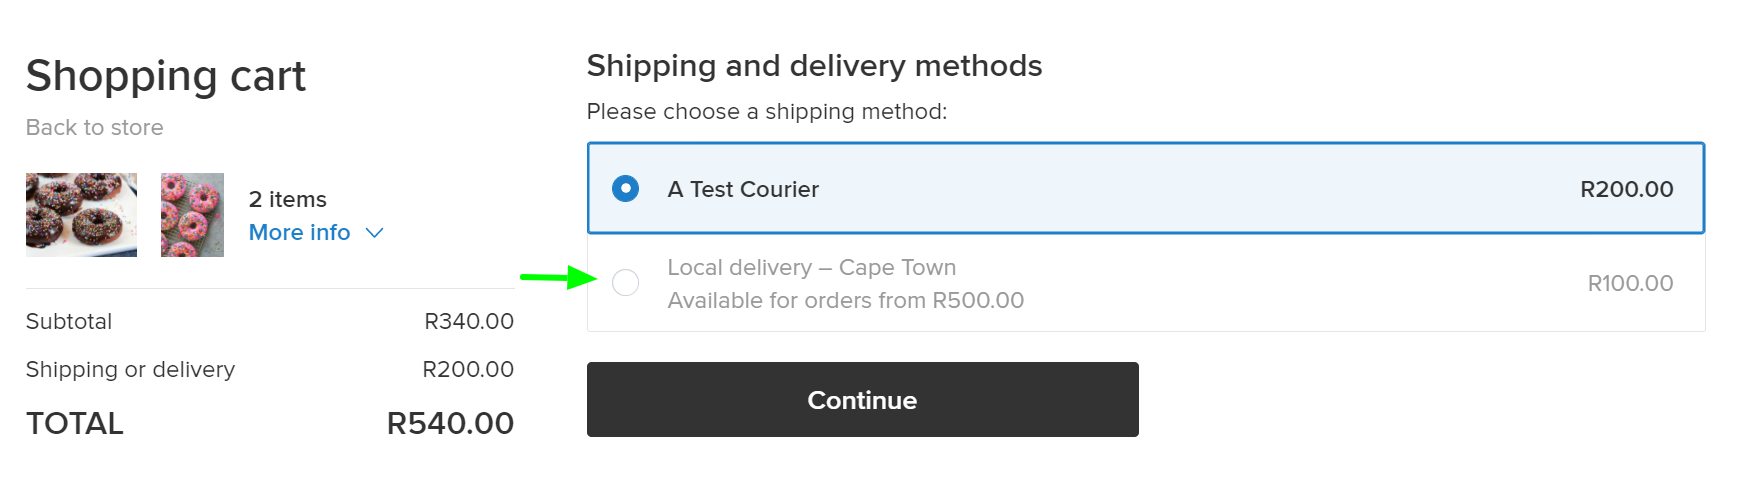
Optional: You can automatically inform your customers about your delivery condition at checkout and thus encourage them to order more to be eligible for this delivery option. For this, click Limit availability by order subtotal and specify the minimum order subtotal. For example, R500. Now, if the order sum is lower than R500, this delivery option will still appear at checkout but will be greyed out till the customer adds more products to the cart and reaches the required minimum subtotal:
8. To make this delivery option look more attractive to customers, specify a much lower rate per order compared to other delivery methods. In our example, the rate per order is R100.
You can also set up a free delivery option to encourage your customers to buy more. Learn more about offering free delivery for orders above a certain subtotal in the article about Free shipping.
9. If you deliver only at certain times, click Limit availability to operating hours and specify the days and hours when this delivery option should appear at checkout.
10. To offer this delivery option only in your local area, click Set delivery zone and create a zone.
11. Click Save & Finish.
Limiting local delivery to certain times
You may want to let your customers know of your operating hours at checkout to prevent them from ordering when you are unavailable or can’t prepare and deliver their order in the near time. This can be useful if you, say, sell food and a hungry customer tries to place an order late at night when your restaurant kitchen is closed.
To make a delivery option available on certain business days and hours at checkout:
1. Go to Shipping & Pickup in your store admin.
2. Choose the local delivery option you want to edit or create a new delivery option.
3. Scroll down to the Set operating hours setting and turn it on.
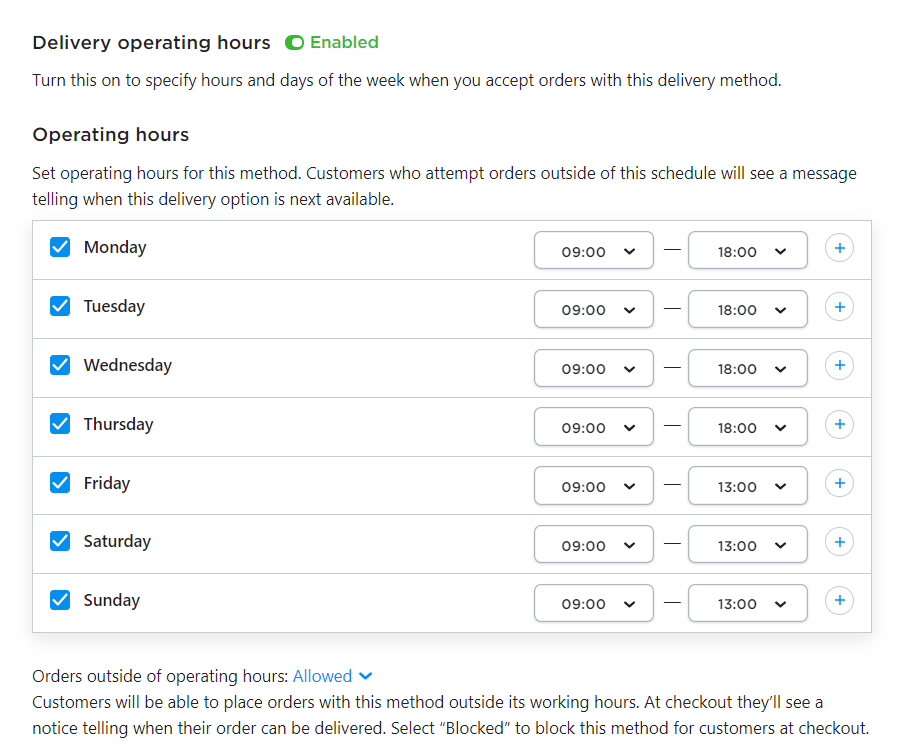
4. Check off the days and choose the times when this delivery option should be available. You can choose several operating hours intervals during one day:
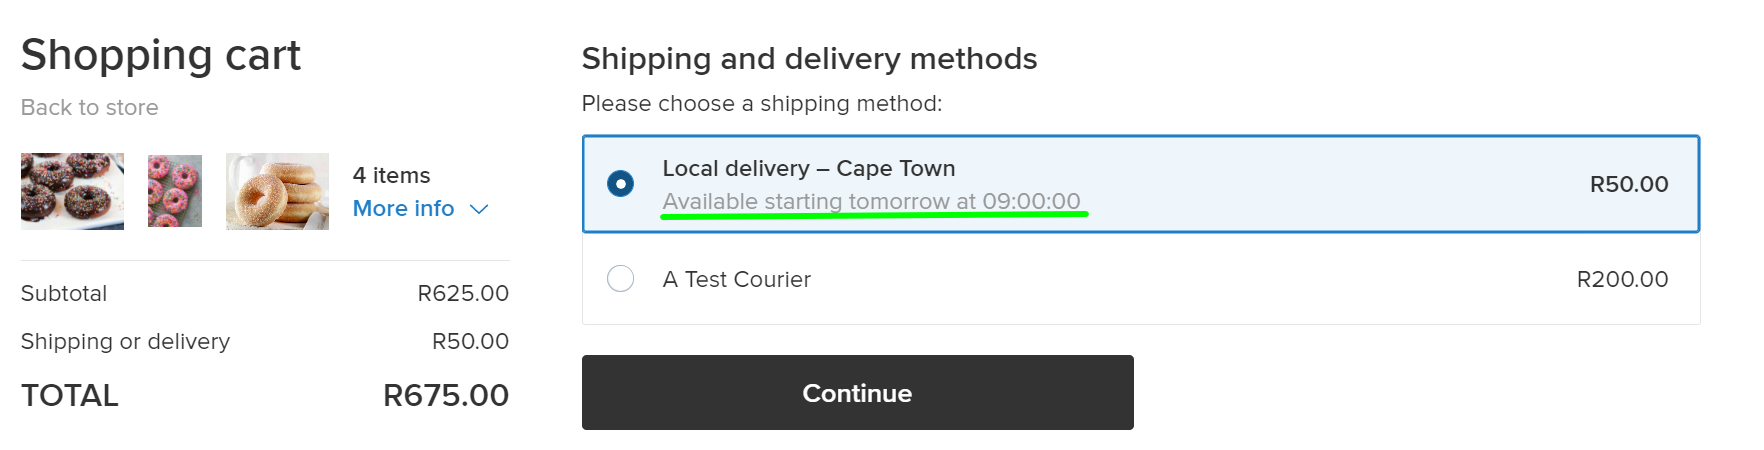
5. To allow customers to place orders outside of operating hours, for example, at night or during weekends, in the Order outside of operating hours dropdown menu choose Allowed. Your customers will be able to place the order at any time. They will see a message that displays the nearest time for delivery according to your operating hours. If it’s best for your business to receive orders only during the operating hours, in the Order outside of operating hours dropdown menu choose Blocked. Customers attempting to place orders outside of the selected schedule will see this delivery option as unelectable with a message about the next available time for placing the order (you can change the wording if you wish):
6. Click Save & Finish.
Setting up operating hours improves your time management by helping you beat the clock and prepare all orders in time. And by allowing customers to place orders after business hours you encourage them to order immediately without putting it on hold.
If you deliver 24/7 just turn off Set operating hours so that your customers can order at any time and day they want.
Adding delivery time picker at checkout
You can enable a date and time picker at checkout for your customers, allowing them to choose a convenient delivery time from the calendar without contacting you for details. Giving your shoppers an option to choose a date and time for delivery makes their customer journey more comfortable. Apart from that, you can work with pre-orders and better manage your business. For example, if you make cakes for special occasions it’s convenient to know in advance the date for delivery. Same for the flower shops, which deliver for special occasions.
To enable date and time picker for your customers at checkout:
1. Go to Shipping & Pickup and choose the delivery option you want to edit or create a new one.
2. Scroll down to Ask for delivery date and time at checkout and turn it on.
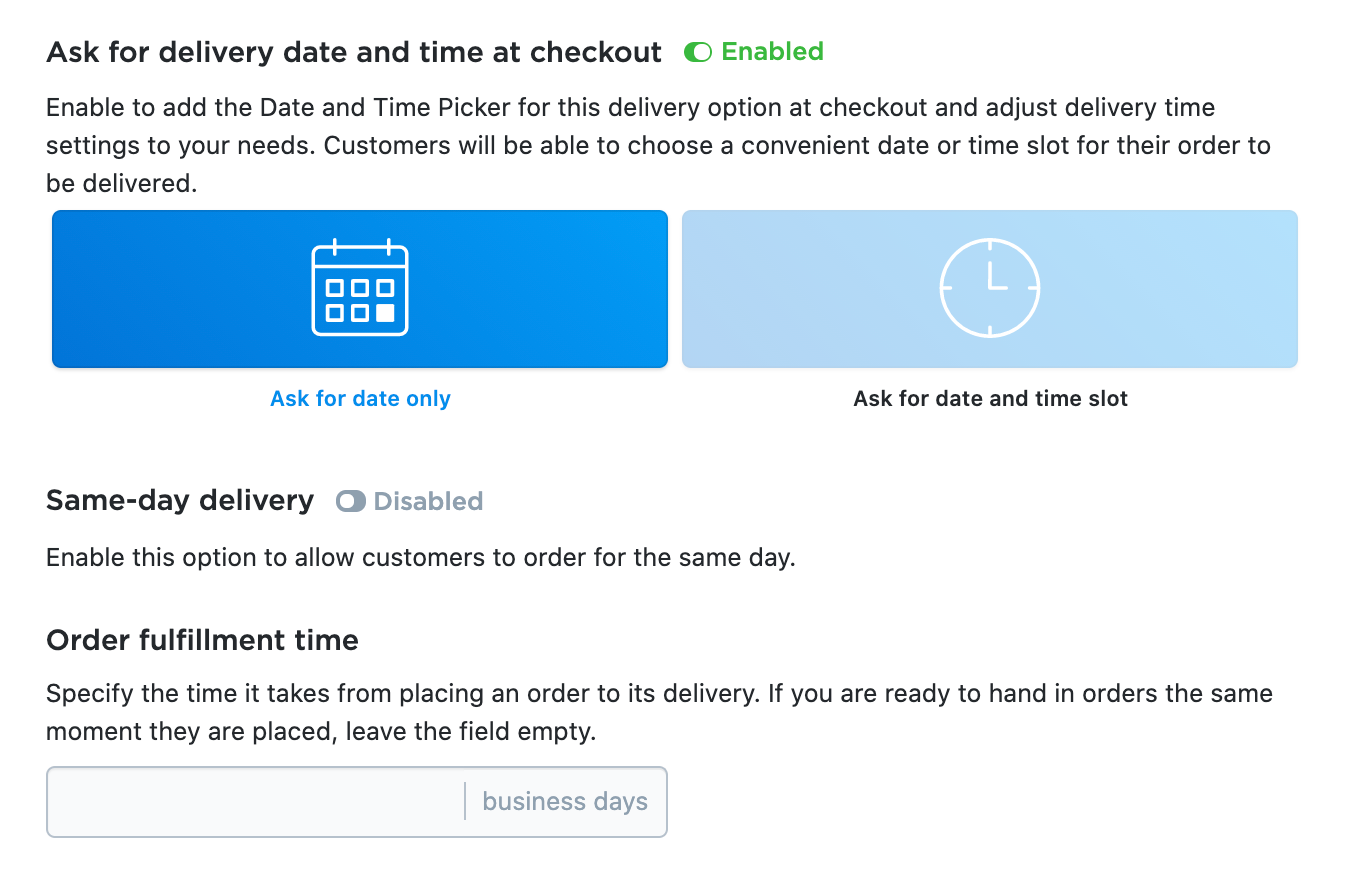
3. Choose Ask for date only option to limit delivery time choice for buyers by date only. Choose Ask for date and time slot if you want your customers to choose the date and time of delivery according to your operating hours:
4. If you haven’t specified the delivery hours in the Set operating hours card, your customers will be able to pick any days of the week and hours in the delivery time picker at checkout.
5. If you picked Ask for date and time slot option, you need to specify Delivery time slot lengths. It allows you to set the precision for the delivery time on checkout. The time slot is set up for 1 hour by default. You can pick another time slot in the dropdown menu if you deliver faster or longer than that.
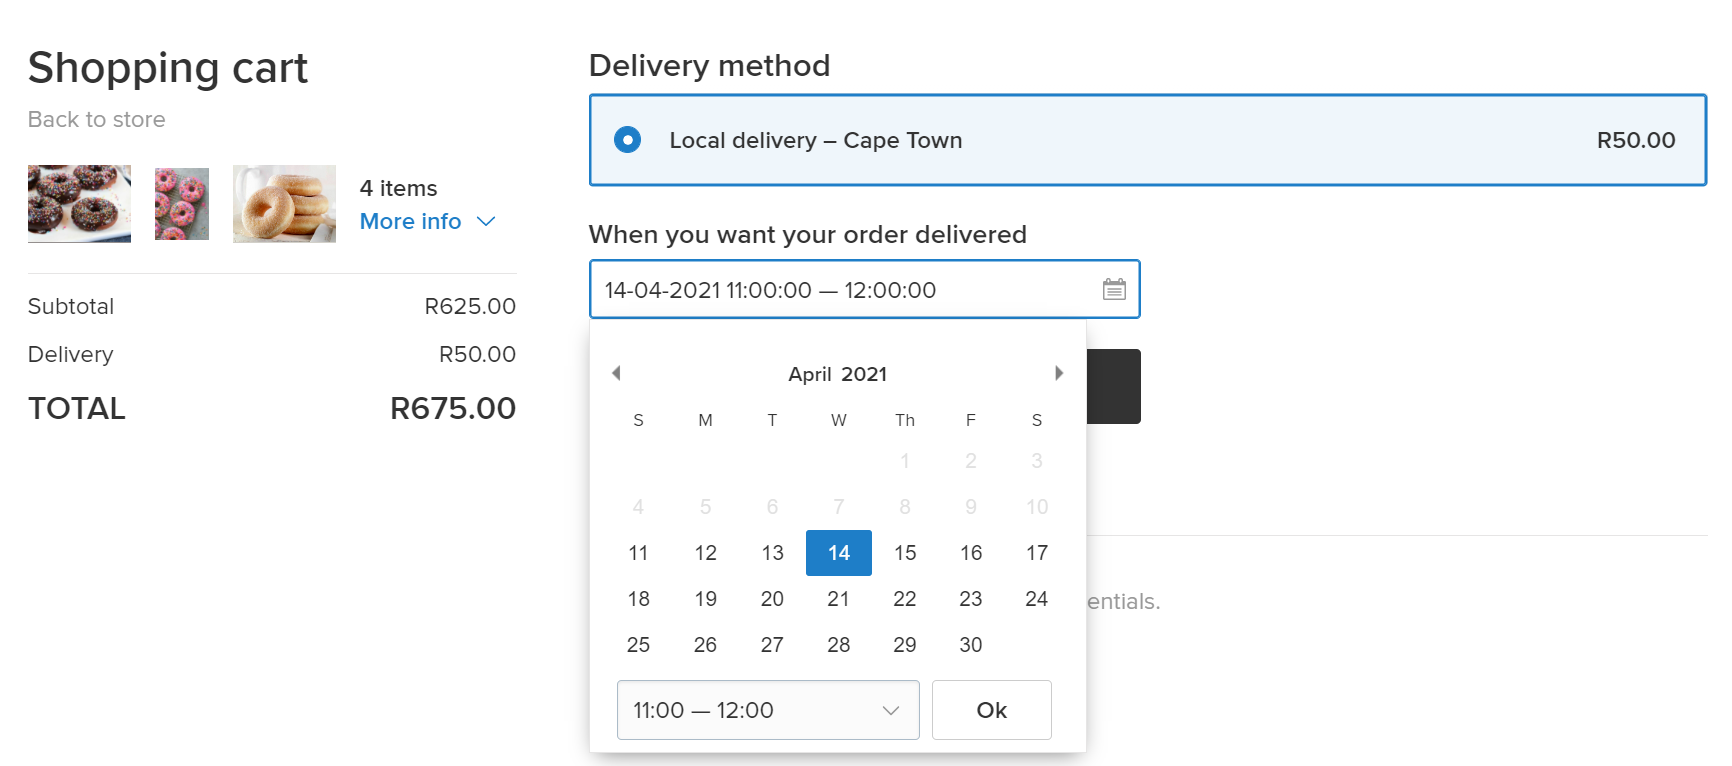
For example, you chose a 1 hour slot length. In that case, your customers can choose delivery within 1 hour window. So, if a customer wants their purchase to be delivered tomorrow morning, they could choose 11:00 – 12:00 delivery next day:
5. Turn on the Same-day delivery setting to let your clients choose delivery on the same day they place the order. Leave it disabled if you don’t want to rush or need time to plan the delivery route. You can customize the latest time for same-day delivery in the Cut-off for same-day delivery field. It’s useful if you deliver all orders at a particular time every day, or if you run a restaurant and the kitchen is closing, for example, at 19:00. In that case, you may want to choose 18:00 as a cut-off time for same-day delivery. So if a customer places their order after 18:00, they will be able to choose a delivery time for the next business day.
6. Select the convenient Order Fulfilment Time. Fulfilment time is the average time from an order placement to its delivery to the customer. Specify the time it takes you to prepare an order for delivery plus your average delivery time. You can choose minutes, hours or business days in the dropdown menu for Ask for date and time slot. For the Ask for date only option you can choose days only. For example, you run the restaurant and know that your kitchen staff can prepare one course in 20 minutes. You deliver in the 10 kilometre radius and usually, it takes no more than an hour before the order will be handed over to the customer. So it’s better to set up 2 hours (or 90 minutes if you like) as your Order Fulfilment Time not to keep your clients waiting and help your business run smoothly. Order Fulfilment Time is taken into account when offering delivery time picker at checkout. Let’s say, you set up your Order Fulfilment Time to 1 hour (and your Delivery time sloth length is also 1 hour). Your customer is placing an order at 12:15 and at checkout he’s offered to choose time for delivery. The nearest window available for him or her will be 14:00 – 15:00, not 13:00 – 14:00. So the Order Fulfilment Time option provides you with enough time to fulfil the order, while your customers can schedule a preferred delivery time. If you are ready to hand in the order the same moment it’s placed, leave this field empty.
7. Click Save & Finish.
Charging different delivery fees in different areas
To charge different delivery fees depending on the distance from your store, you can add several delivery options in your store, each with its own rate and zone. For this, follow these steps as many times as many delivery options you need: Setting up local delivery. For example, you sell flowers and want to bring orders for free to the customers in your store area and offer a R50 delivery for customers from more distant areas. In this case, you need to set up one delivery option as Free Delivery and another delivery option as a Flat Rate delivery.
During the set up make sure to create a separate delivery zone for every delivery option that does not overlap with each other. If the zones overlap, i.e customer’s address is in both zones, both delivery options will show up at checkout for the customer’s choice.
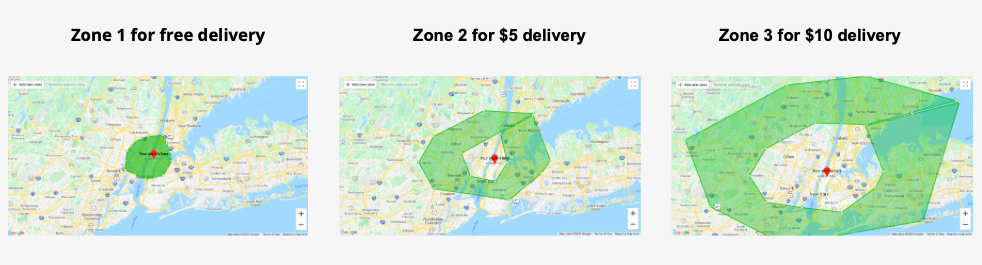
Here is an example of a zone setup for each delivery option if you want to offer free delivery to your nearest customers (zone 1) and a paid delivery to more remote areas, say, R50 delivery option for the neighbouring areas (zone 2) and R100 delivery option for more distant customer addresses (zone 3).
You can make a screenshot of your delivery area(s) and add the image to the Delivery page on your website where you describe your shipping/delivery/pickup policies. Thus your customers will see before checkout if you deliver to their address and what is the delivery fee.
Delivering from multiple locations
Assume, you have two restaurant locations and want to prepare and deliver food from the location that is nearest to your customer’s address. In this case, you can create two delivery options with different names using this instruction Setting up local delivery and draw different delivery areas on the map for each option. This way, during the checkout process people from one area will see the delivery method #1 and the people from the other area will see the method #2. When you receive an order, in the order details you will see the chosen delivery method and will know which location should prepare and send the food to the customer.
Managing local orders
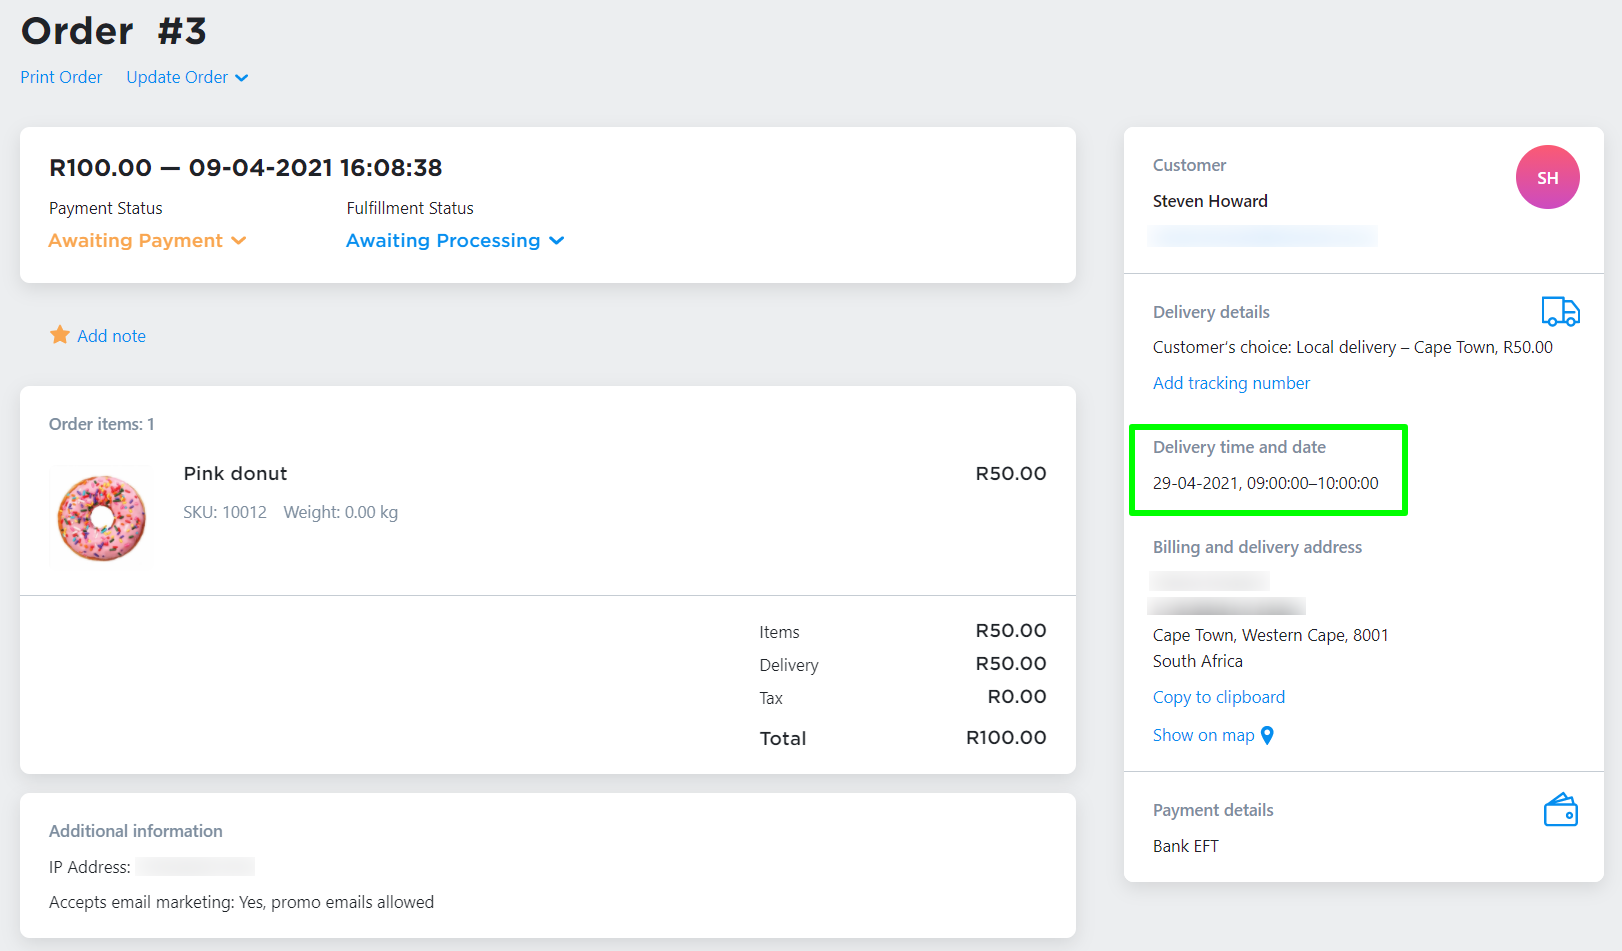
You can always check the information about delivery date and time picked by a customer in the order list at My Sales > Orders in your store admin and in the New Order email notification. Delivery time selected by your customer is also available in their order details:
If you have many orders with the Local delivery option, you can search them by delivery date and time to clearly see what orders should be fulfilled first.
To search orders by delivery date and time:
1. Go to My Sales > Orders and click Filter.
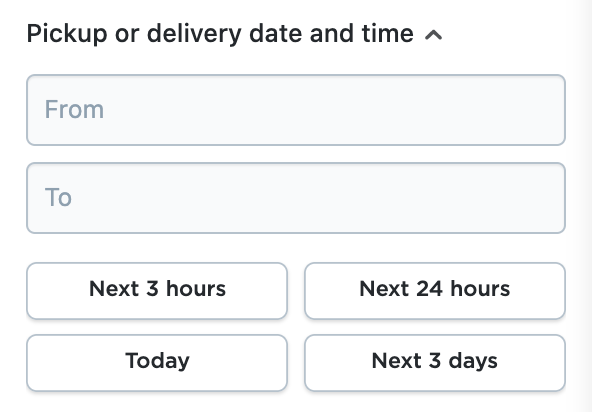
2. Click Pickup or delivery date and time.
3. In the opening form specify the time range you are looking for and you will see all orders in the selected time period.
4. You can also look up for the upcoming orders in the next 3 hours, 24 hours, on this particular day or in the next 3 days by clicking on buttons below:
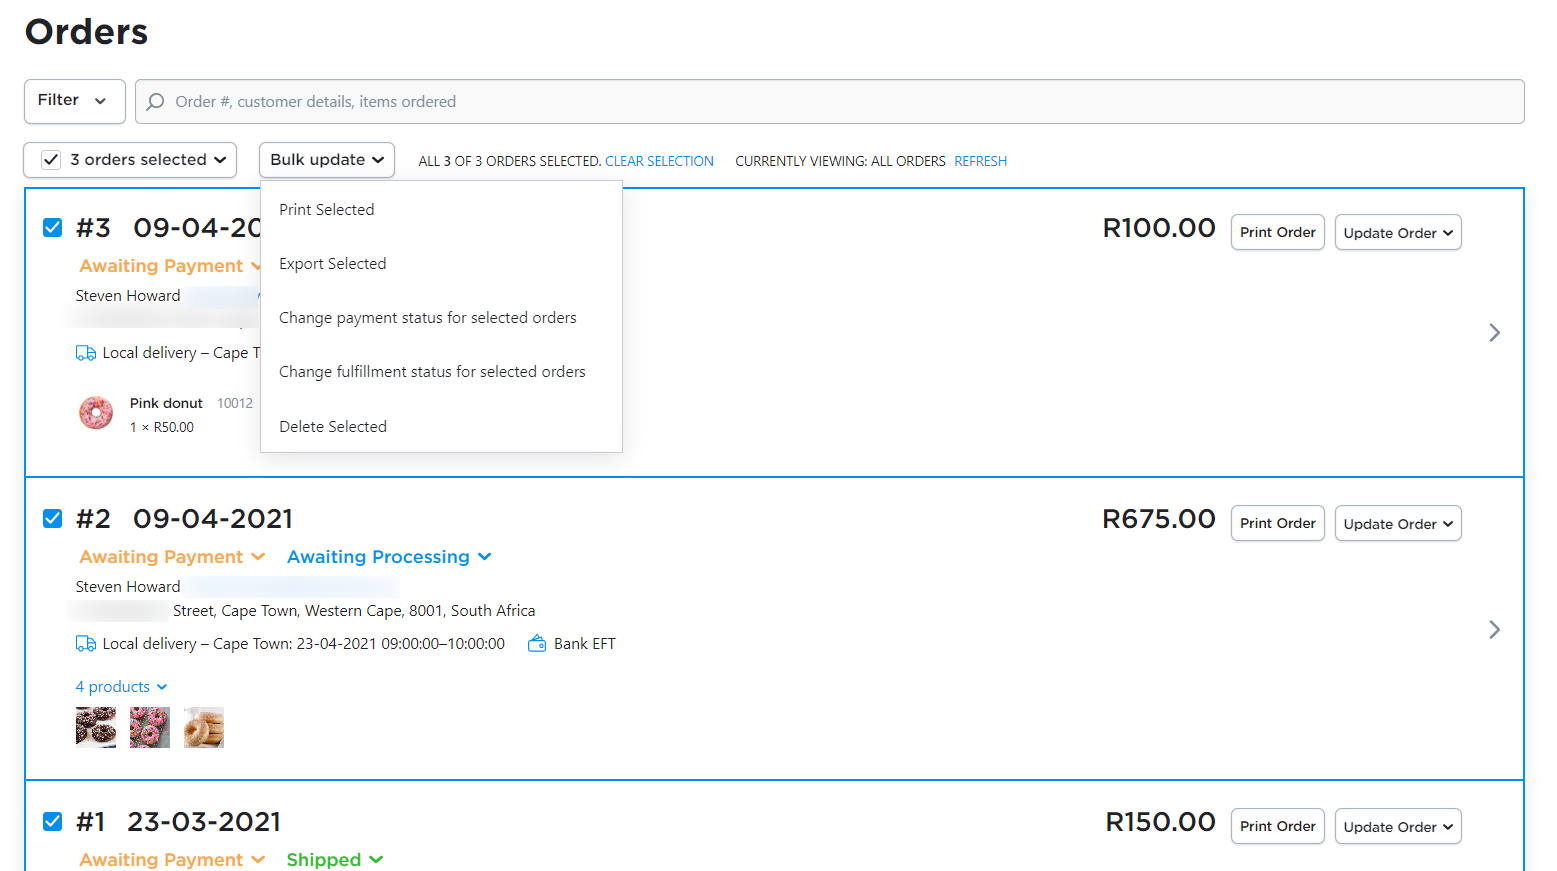
You can update several orders at once by checking the box above the orders list and choosing action in the Bulk update menu. You can print, export or delete selected, change payment or fulfilment status for orders. It comes in handy if you, say, run a restaurant and you need to print orders for your kitchen staff. You can select as many orders as you need and print all of them at once:
If you are used to keeping track of your orders with the spreadsheet, you can download details of the pickup orders to your computer as a CSV file. The downloaded CSV file is compatible with spreadsheets or can be opened and edited in any text editor.
To download CSV file:
1. Check the boxes next to the required orders or simply select all by checking the box above the orders list.
2. In the Mass update menu choose Export Selected.
3. Click Download CSV file.