Adding Netcash Shop to WordPress.org and WordPress.com
There are two solutions: WordPress.org or WordPress.com. The main difference is that if you use WordPress.org, you should take care of your website hosting. If you use WordPress.com, then WordPress takes care of the hosting. There are other differences as well, you can read more about the pros and cons of each variant in WordPress Help or in their blog.
The Netcash Shop eCommerce Shopping Cart plugin is available for both WordPress solutions, so you can add your store to a self-hosted WordPress website or to a site that is hosted on WordPress.com.
To add Netcash Shop online store to a WordPress site, follow this instruction:
If you host your WordPress site yourself, here is how you can add Netcash Shop to it:
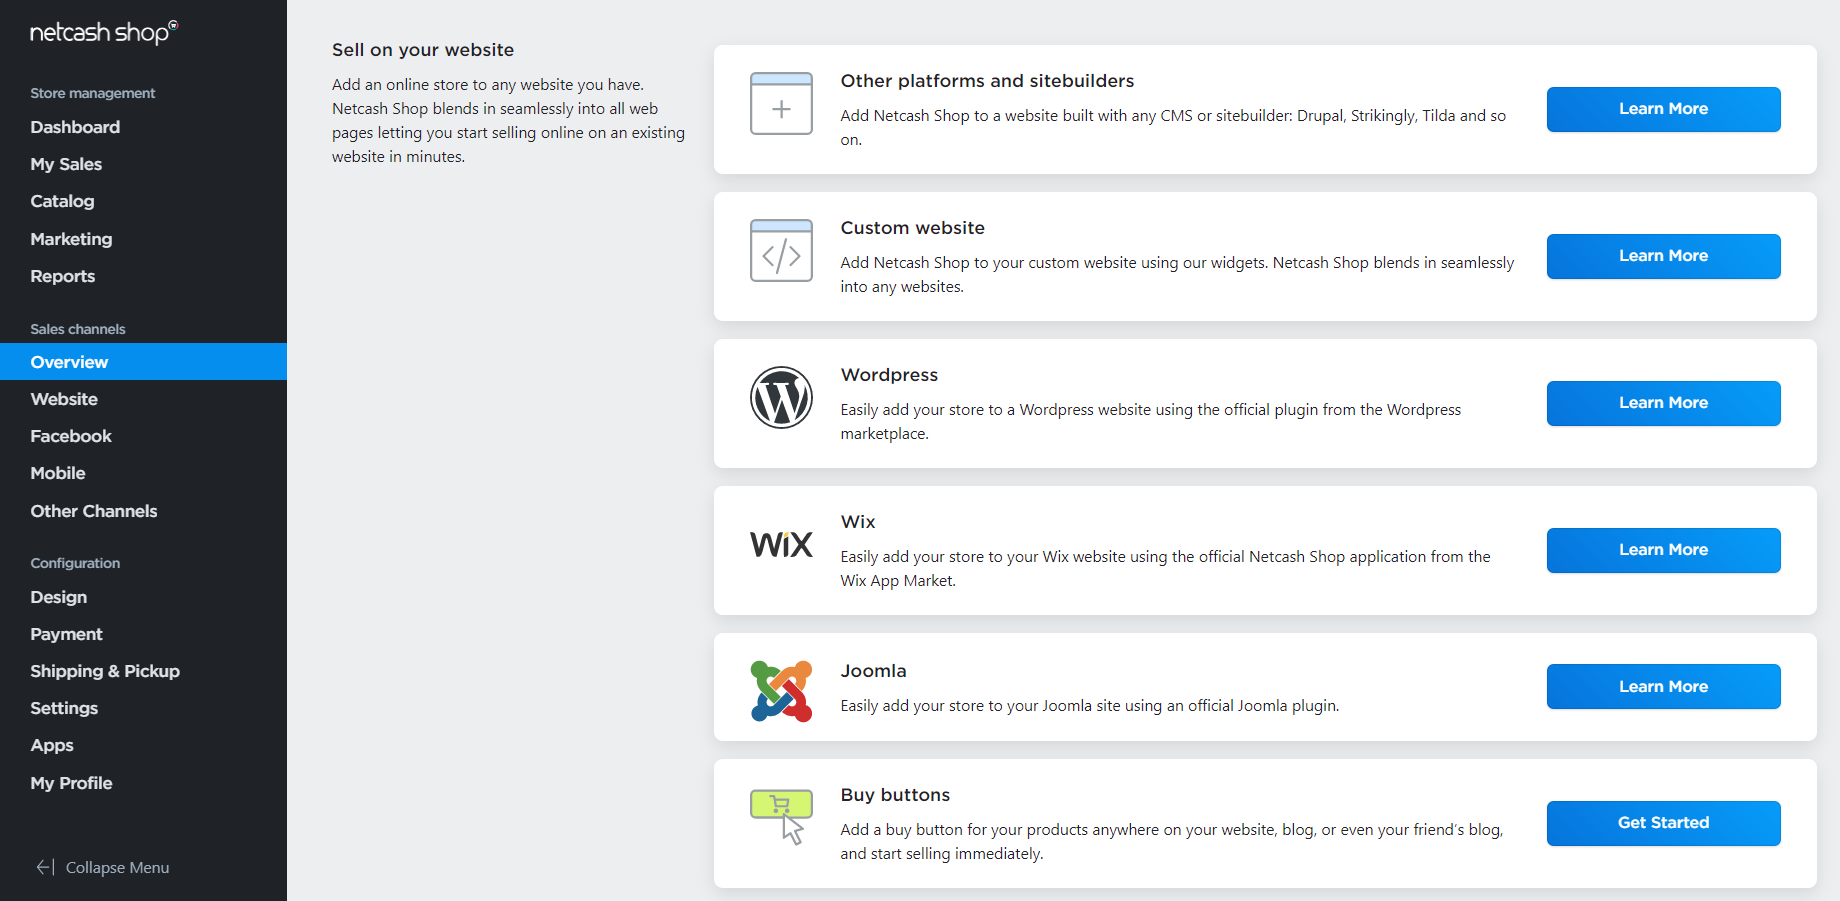
- Open your Netcash Shop admin and go to Sales channels > Overview > WordPress.
- Click on the learn more button.
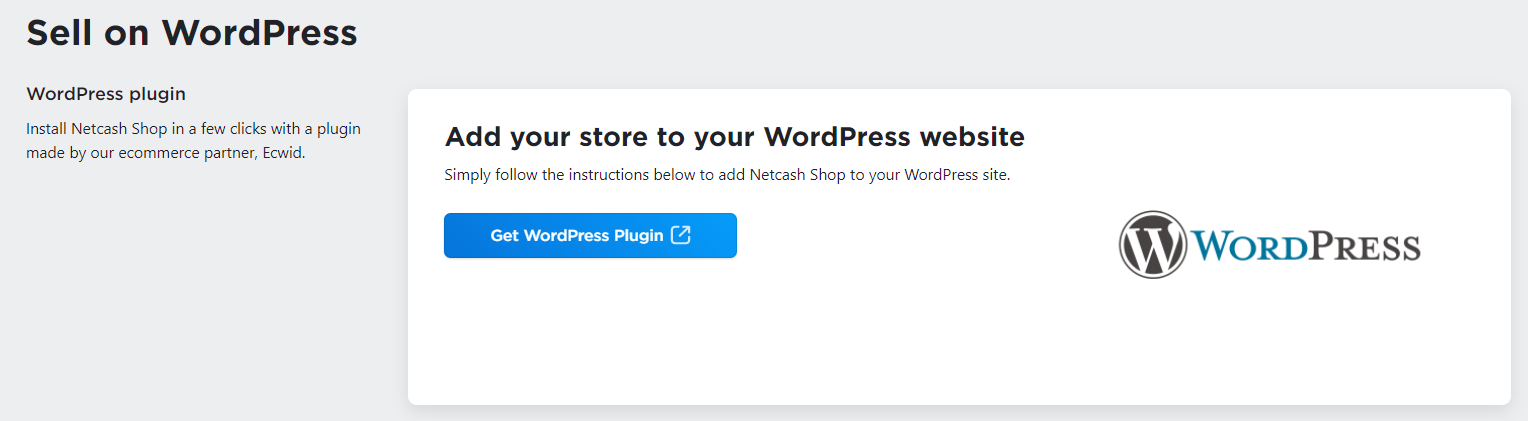
- Click on Get WordPress Plugin to download the Zip File / code:
- When you have added the plugin to your WordPress admin panel you can connect Netcash Shop using your Store ID.
- Open the WordPress page where you want to add the store.
- Click + button in the upper left corner to add block.
- Select Store Home Page.
- Click Update.
If you haven’t added your products to the store yet, a few sample products will appear in your storefront for demonstration purposes. To add your products, manage store settings, and track orders, go to the Netcash Shop admin.
You can access the Netcash Shop admin either from your Netcash Merchant account directly or right in your WordPress back-end.
- In WordPress.org (a self-hosted WordPress site), click on the plugin for Netcash Shop in the menu on the left.
- Go to the necessary section of your Netcash Shop admin, for example:
- Storefront — this section gathers in one place lots of settings that are specific to WordPress. Here you can manage the way your store appears on your WordPress site, like edit your store design, add the store to the home page, display the cart icon in your site’s header, and many others.
- Catalog > Products — here you can remove sample products and add your own products.
- Payment — in this section you can set up the payment options that you’d like to offer to your customers at checkout.
Showing categories on different site pages
You can add products from different categories to different pages of your website. Let’s say you have some products on sale or you sell clothes for men and women and you want to display all these products on separate website pages.
When you add a store category to a separate website page, the link to this page appears on the website menu. This provides more chances to attract customers’ attention as the designated category is visible from any website page.
To add a category of products to a separate page on the WordPress website:
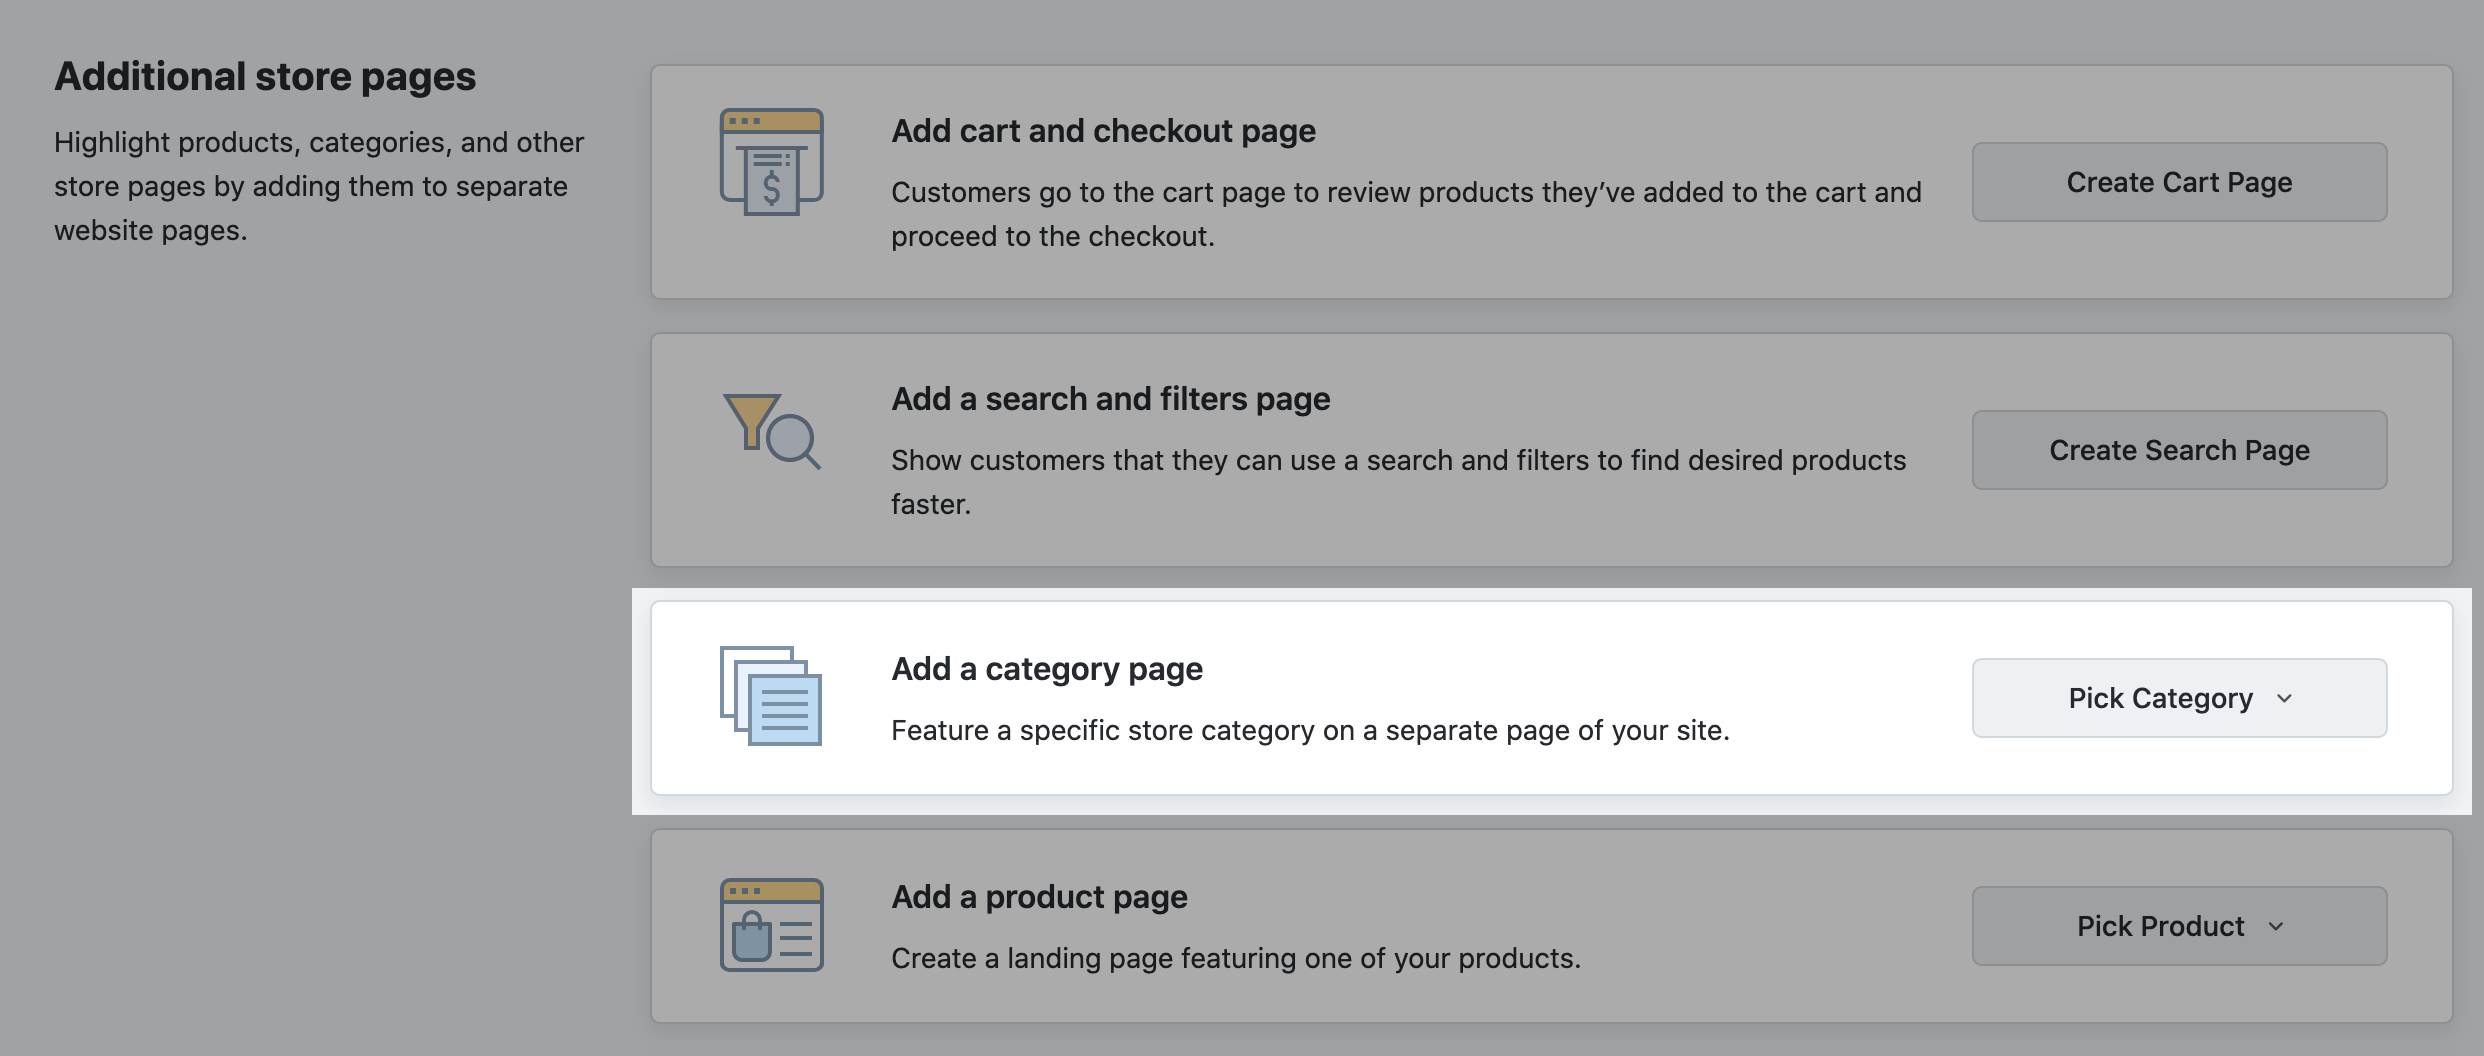
- From your WordPress admin panel, go to Netcash Shop > Storefront. If you use WordPress.com, the path will be My Site > Tools > Plugins > Netcash Shop > Storefront.
- In the Add a category page section, click Pick Category and choose a category you want to show on the page:
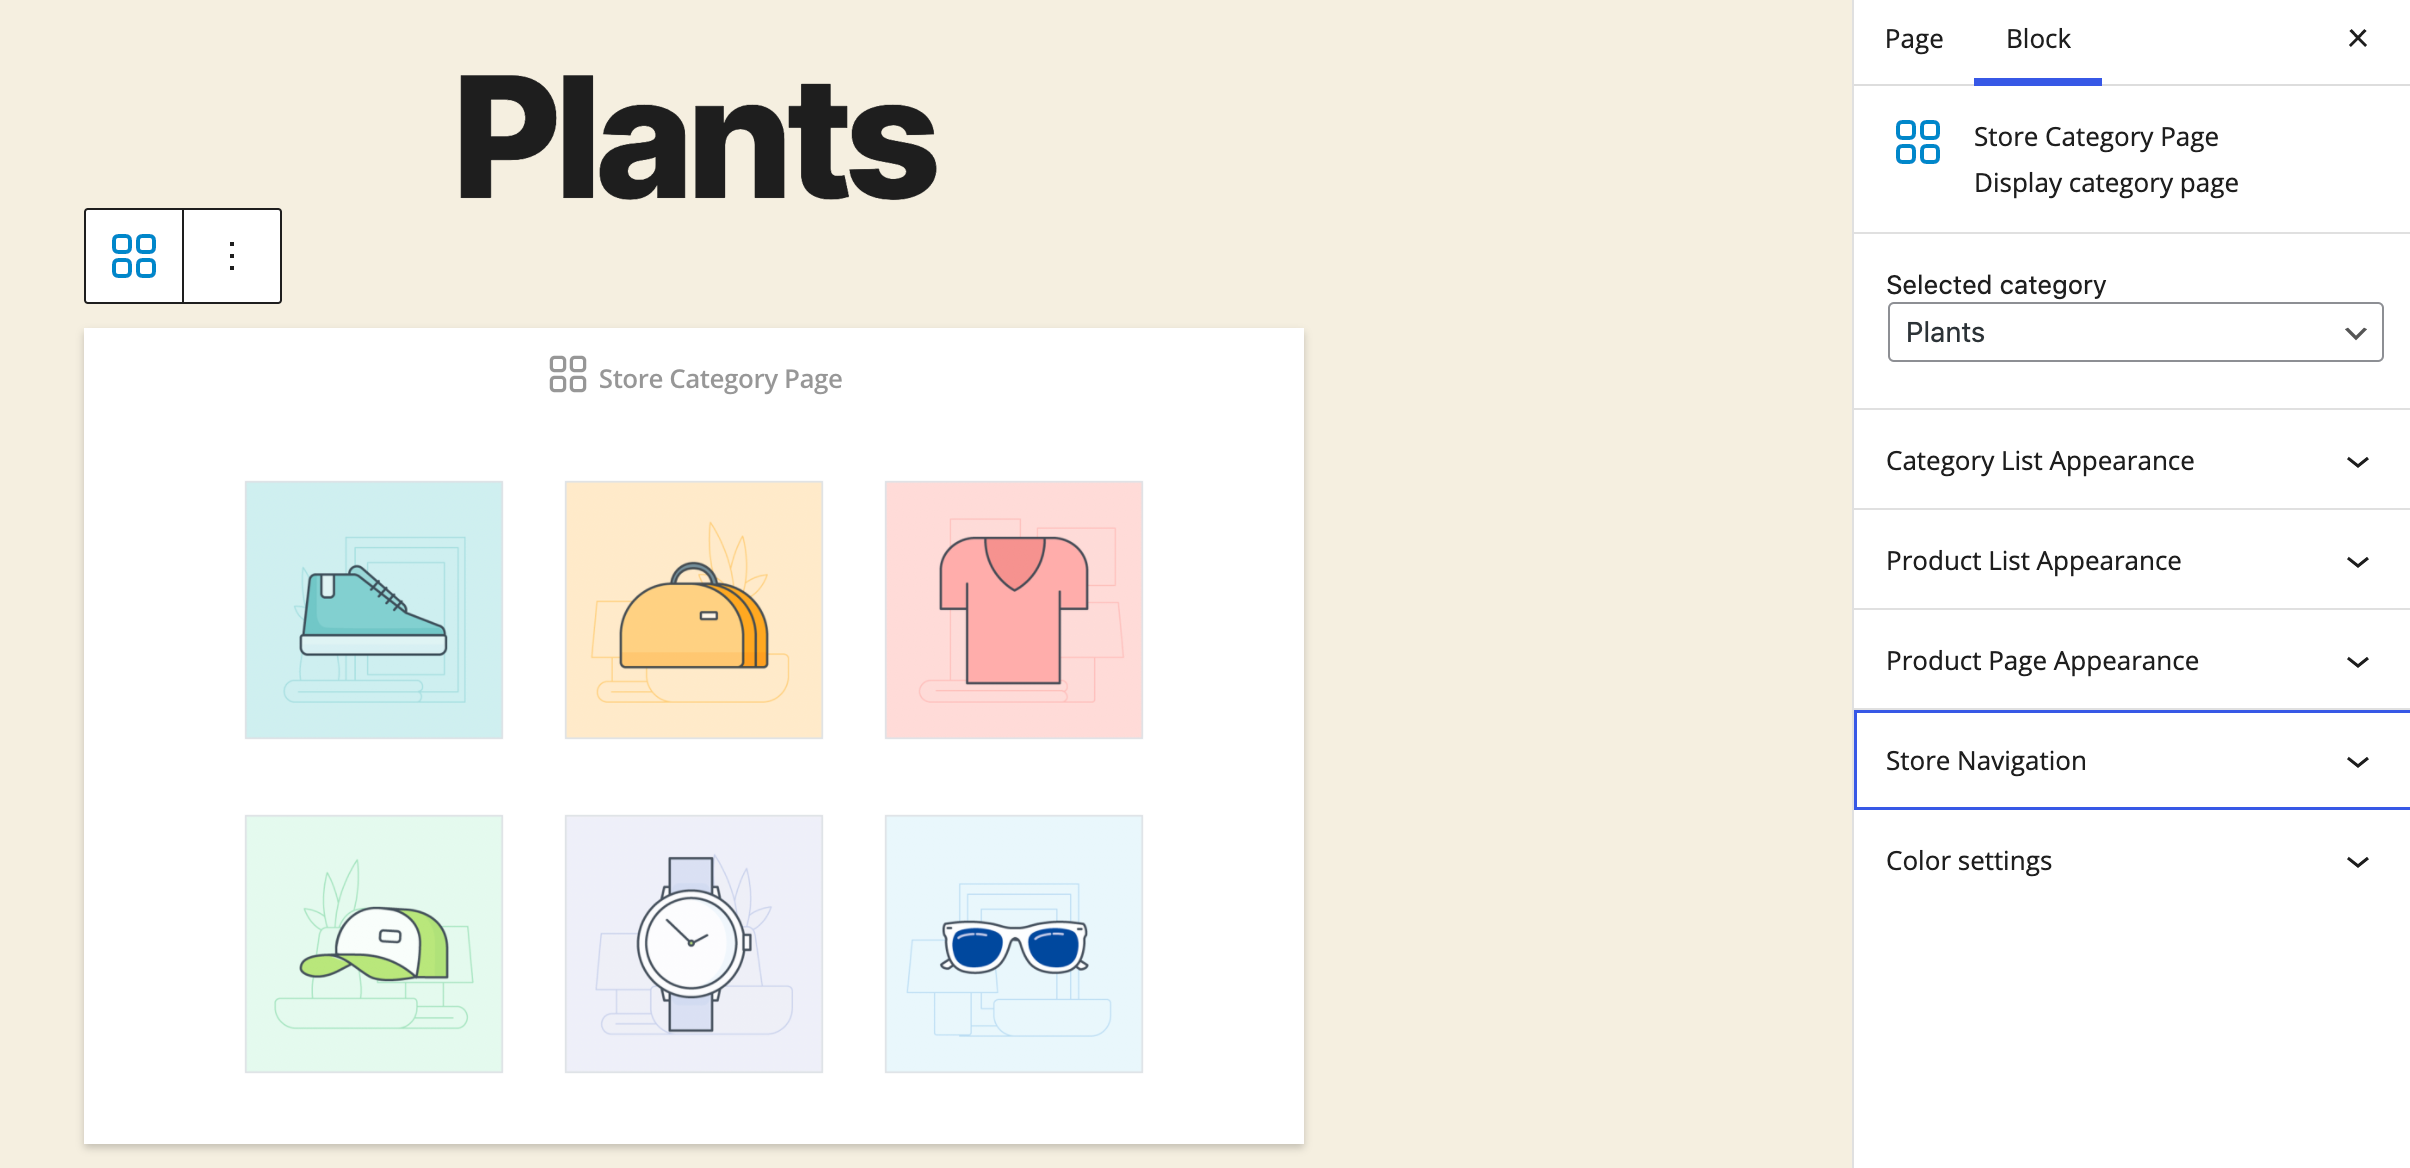
- If necessary, customize this category’s design (these changes won’t affect other categories) – select the block with the store category to see its settings and choose from the design options in the Block on the right:
- Click Publish when you are satisfied with the result.
- Repeat the above steps with other categories.
That’s it, you have added your store categories to different website pages and your customers can access them from your site menu.
Featuring one product on a page
You can add one product from your Netcash Shop to any website page. For example, you can create a landing page for a new product or highlight a non-selling product in a post to stimulate sales.
To add one product to a page on the WordPress website:
- Go to your WordPress Dashboard > Pages and open the page where you want to add a product. You can add it to a new or existing page.
- Click the + button in the upper left to add new block.
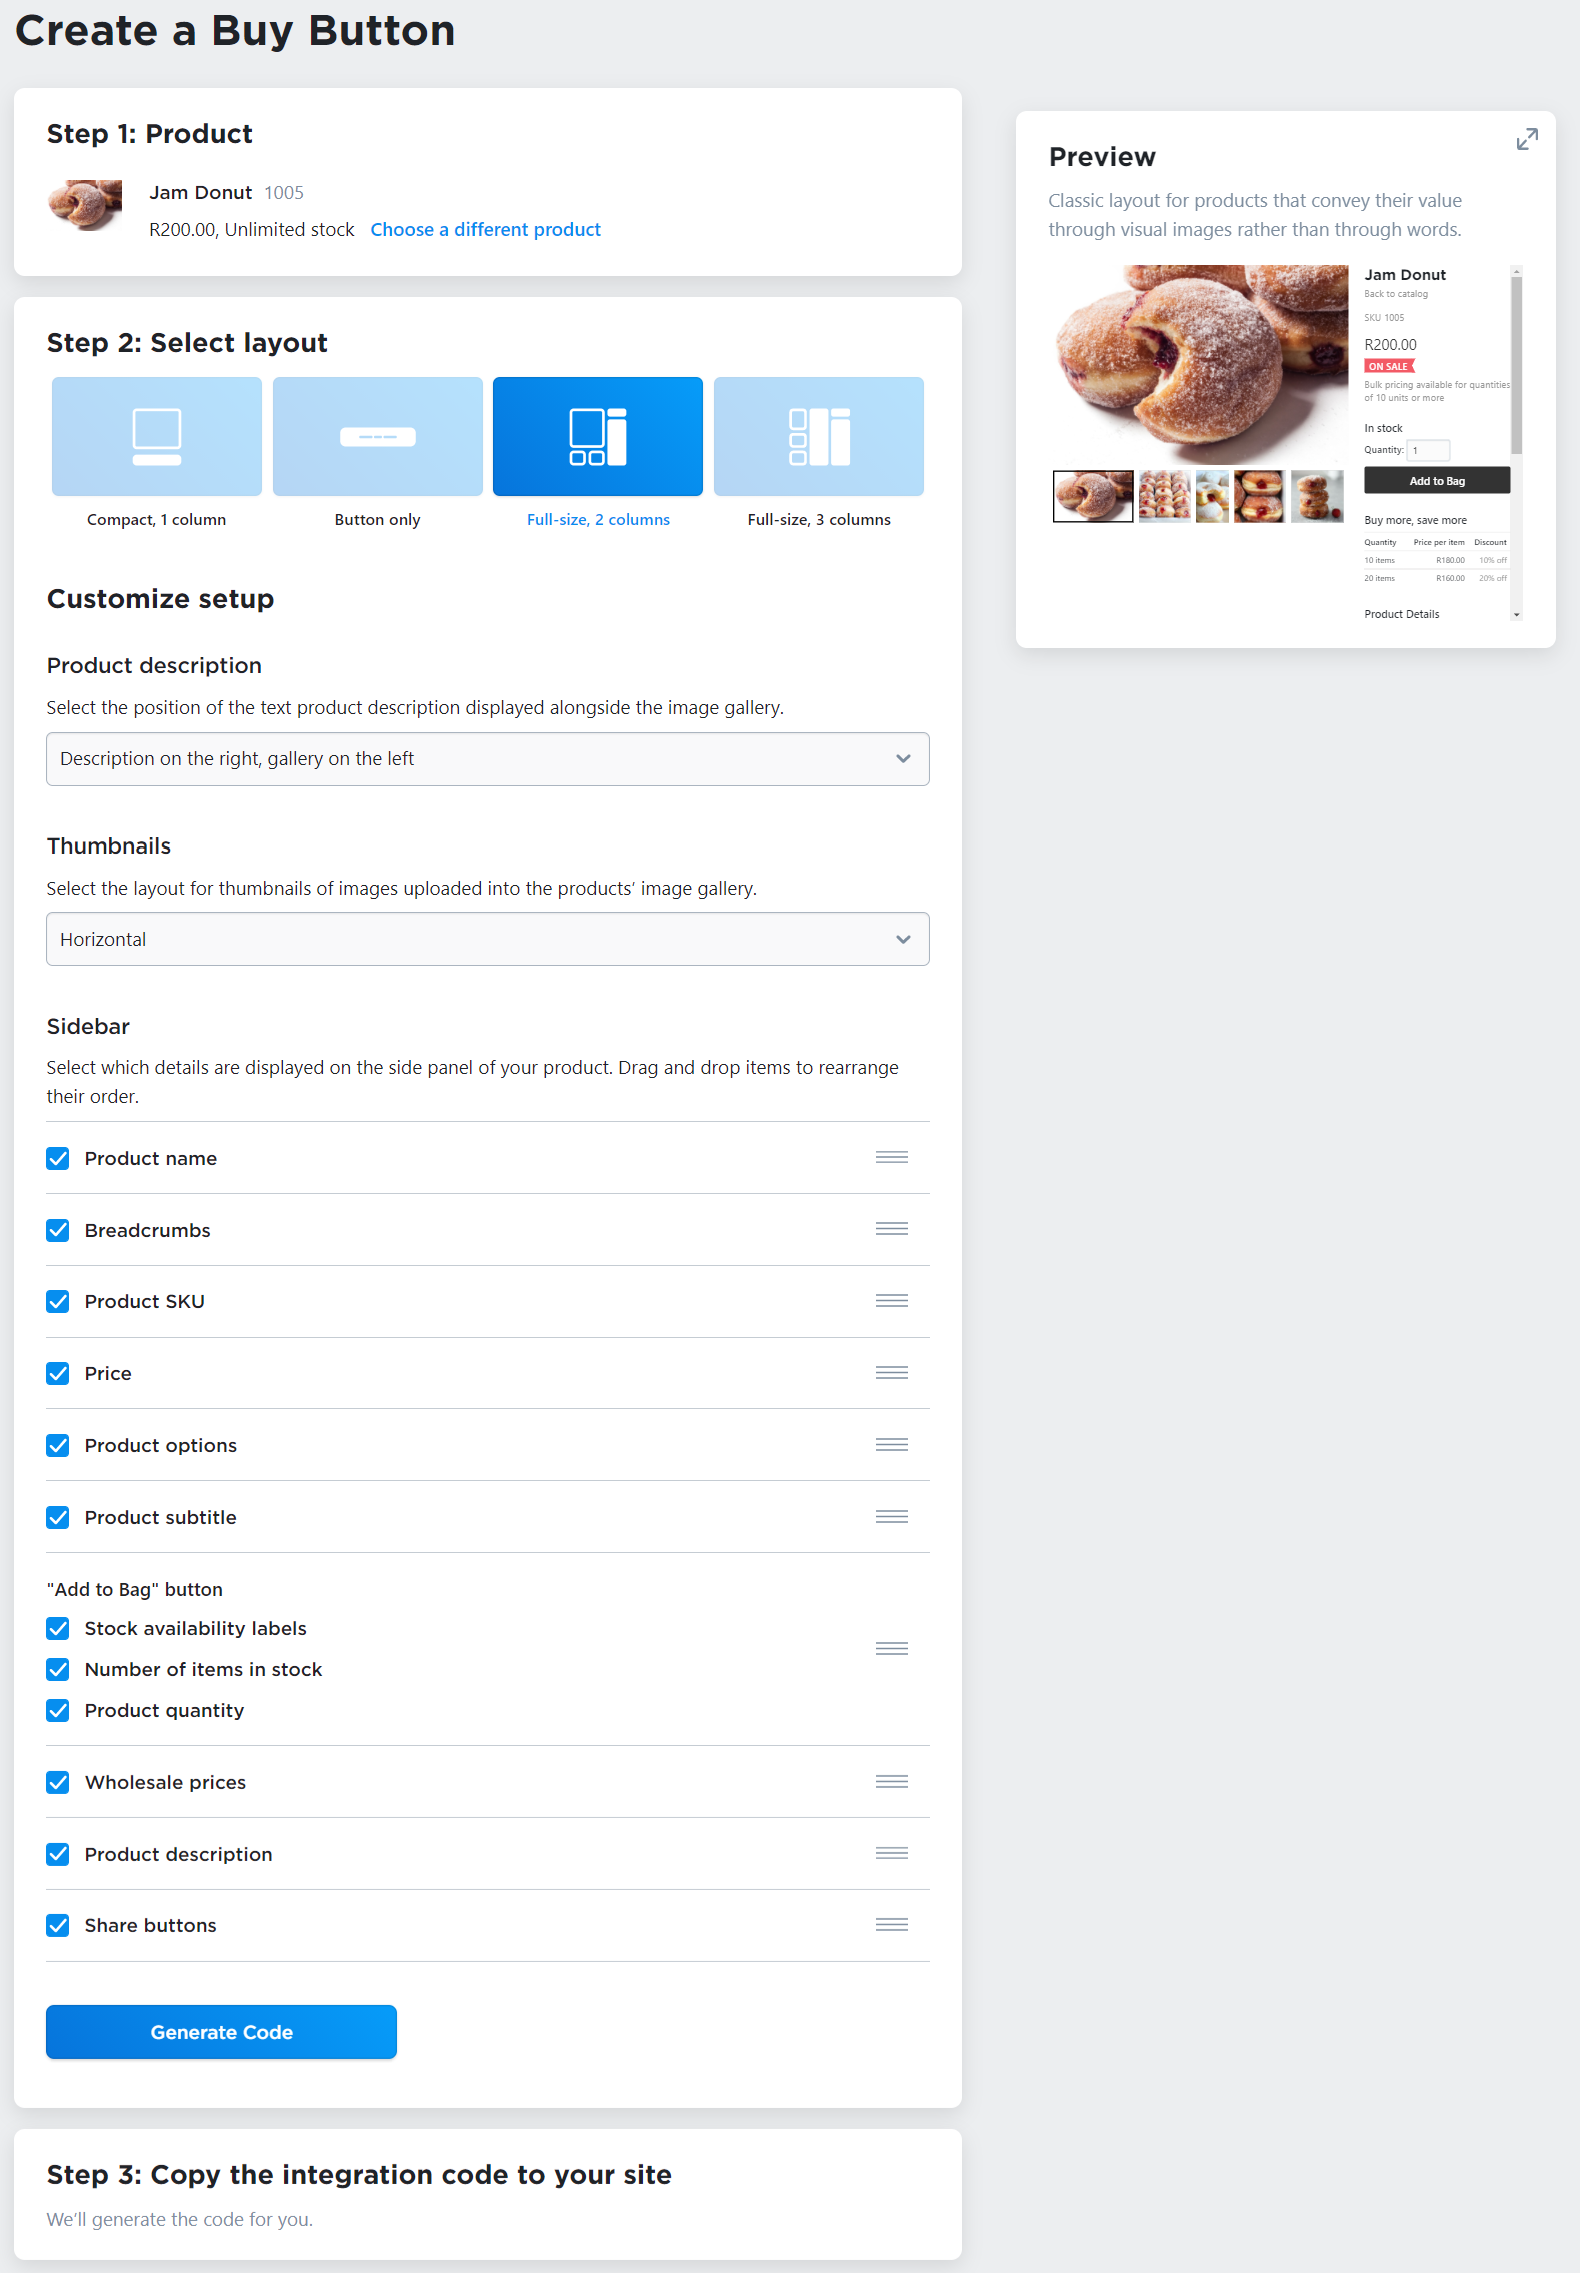
- Depending on how you want to represent a product, click on the appropriate block: Product Card Large (it includes product description and gallery), Product Card Small or Buy Now Button.
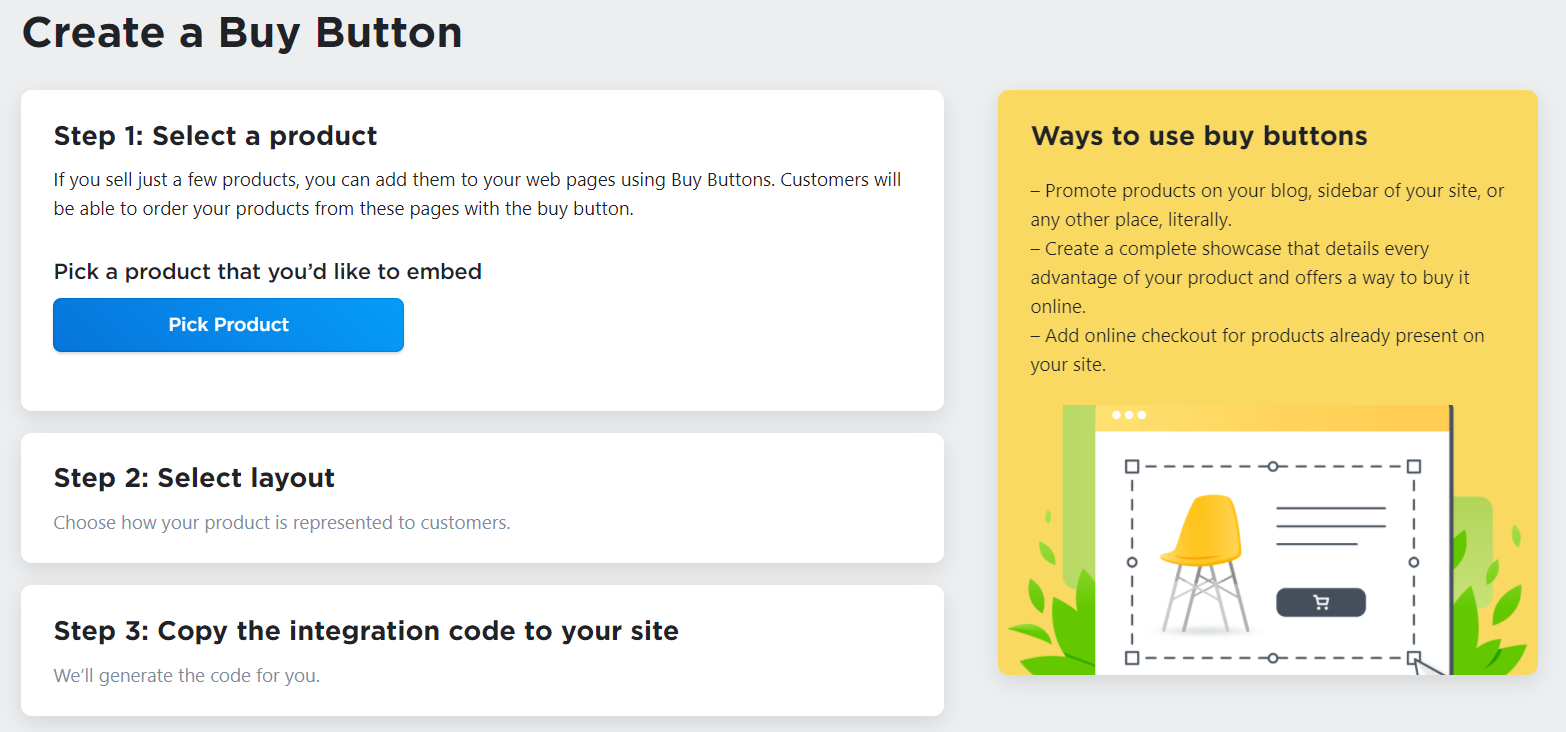
- If you want to modify the appearance of the product card, click on the block with the product and change the block settings on the right:
- Click Update to save the page changes.
Alternatively, you can create a landing page with a product from the Netcash Shop menu inside your WordPress admin panel. The Product Card Large with all product details will be added to the page in this case:
- From your WordPress admin panel, go to Netcash Shop > Storefront. If you use WordPress.com, the path will be My Site > Tools > Plugins > Netcash Shop > Storefront.
- In the Add a category page section, click Pick Product and choose a product you want to show on a separate website page.
- Click Publish.
Adding a drop-down menu with categories
If products in your store are divided into categories, you can show store categories in the drop-down of the website menu. This will improve your website navigation and will help customers find products faster.
As you add new root categories to the store, Netcash Shop automatically adds them to this menu.
Here is how to add the Netcash Shop categories to your WordPress website menu:
- Go to the WordPress Dashboard > Appearance > Menus.
- Open the Store tab.
- Tick Store with Categories Menu:
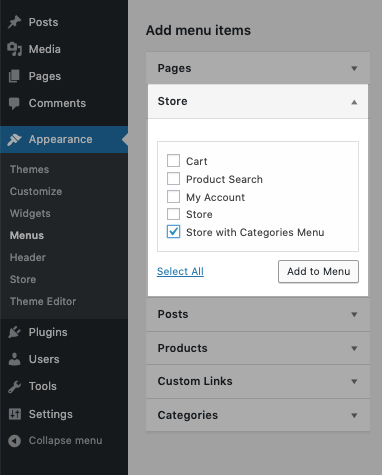
- Click Add to menu.
- Click Save Menu.
Also, in Appearance > Menus you can add other store links to your website menu:
- Cart: adds a link to the cart page
- Product Search: adds a link to a page with the search and filters
- My Account: adds a link to the customer store profile page
- Store: adds a link to the main store page
Select what links will be helpful for your customers and add them to the website menu.
FAQ
Can I add several stores to one WordPress website?
You can have two or more different Netcash Shop’s on the same WordPress website. Add one store with a plugin and add additional stores with a code. Don’t be afraid of the “code” word. It’s a ready code — you just need to copy and paste it.
You can also add different categories of the same store to different website pages.
To add the second store with code:
- Go to the Shop admin > Website.
- Scroll down to the Add your store to one more website section and click Pick Platform.
- Scroll down to Other platforms and sitebuilders and click on it.
- Click the Copy Code to Clipboard button. Now you’ve got your store code:
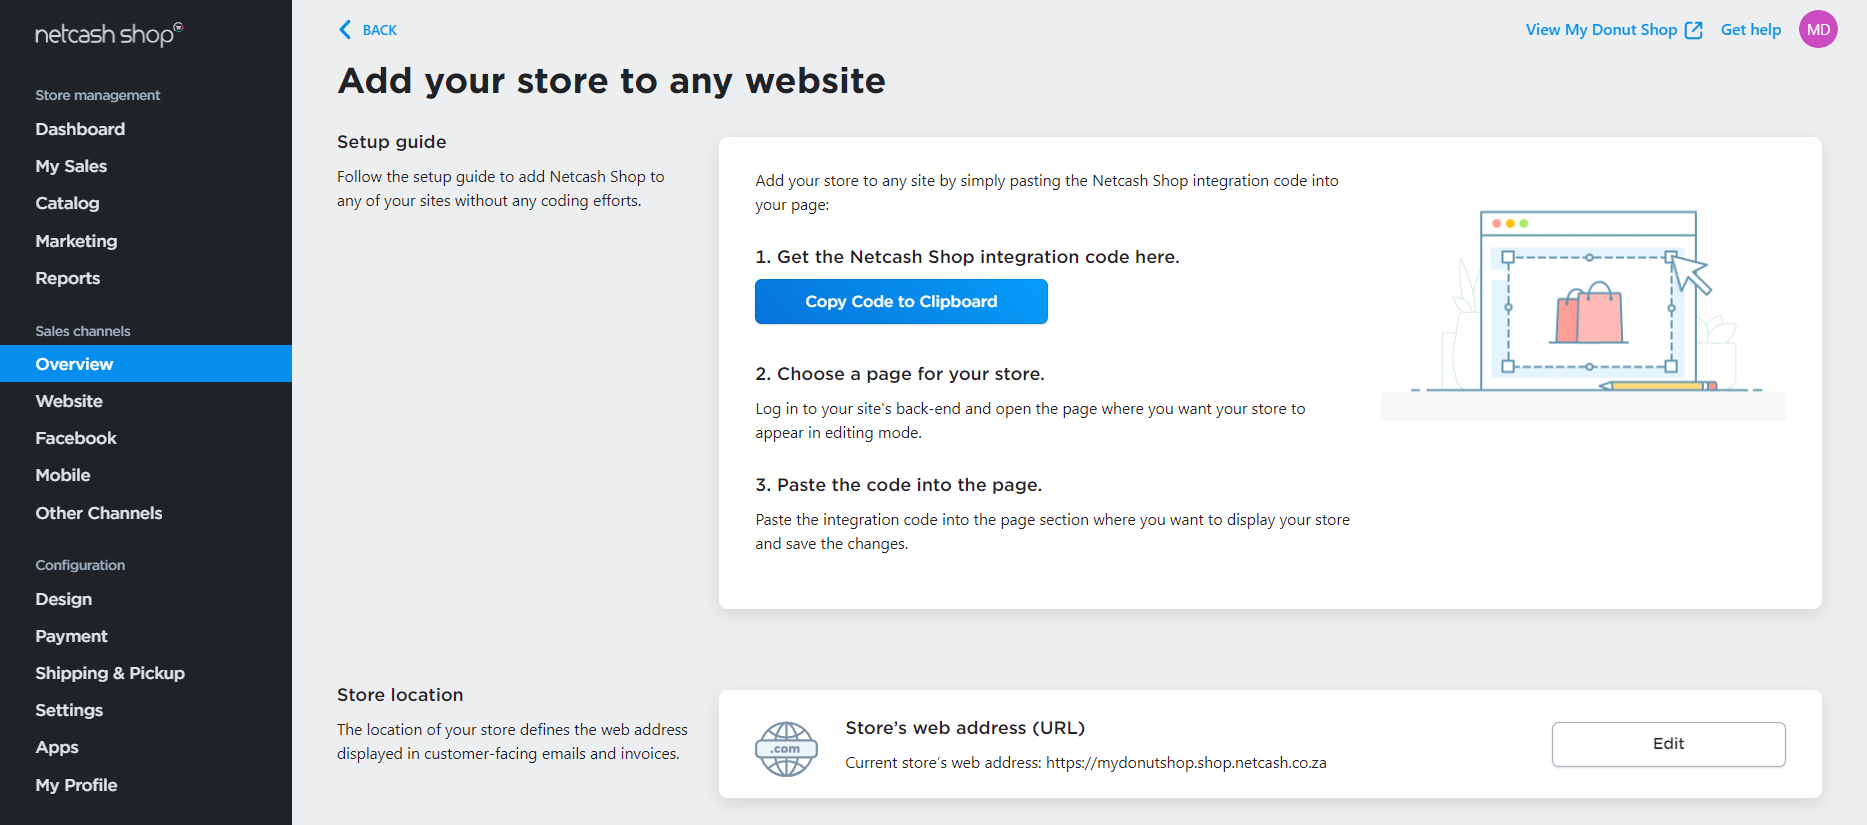
- Go to the WordPress Dashboard > Pages and open the page where you want to display the store.
- Click the + button in the upper left corner to add a new block, scroll down to Custom HTML and click it.
- Paste the copied code to the field.
- Click Update to save the changes.
You will see the store’s home page on the website. To add other stores to the website, follow the above steps for each store.
Can I restrict access to the Netcash Shop admin panel to certain users?
You can restrict access to your Netcash Shop admin area in WordPress with the help of the User Role Editor plugin. Here’s what you need to do.
- Install the User Role Editor plugin to your WordPress admin panel.
- Go to the Users menu.
- Find the user, you want to block from the Netcash Shop admin.
- Click the Capabilities link
- Use the Quick filter field and find manage_options:
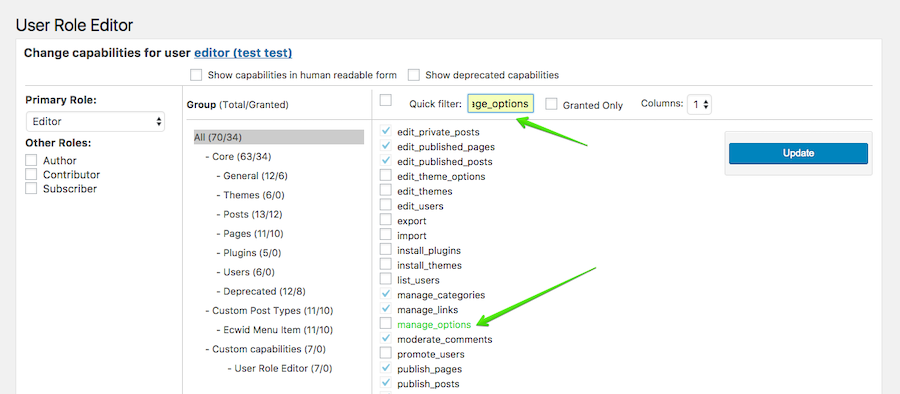
- Disable it and click Update.
- This person will not be able to access your Netcash Shop backend when using your WordPress Dashboard.