Product import is the fastest way to upload catalog or make bulk changes to products (including price and other product details) in an existing catalog. When importing, store converts the data from the uploaded import file into products in your online store. You can import CSV files into store from outside sources like another e-commerce platform or a supplier. You can also export a CSV file from your store, make changes, and then import it back into your store to update your products.
Importing products with a CSV file
If you have a CSV file that was exported from another source, like an inventory list from a supplier, then you need to rebuild it to store’s format. If the format doesn’t match, then the import fails. Learn more about the CSV file format. Tips before you start:
- Click the link to download a CSV template file. You can use it as a template for creating your own CSV files. It includes information about a sample product with comma-separated values.
- Enter product data into the template, following the store CSV file format. Your file from another source may have columns not found while importing to store. Do not paste those columns into the file.
- While uploading the CSV file into your store, make sure columns in the file and columns in the store are in exactly the same order. It’s recommended that you delete all the empty columns from your file so it doesn’t cause any errors.
Once you’ve prepared your CSV file, you can import it into your store:
- From your store admin, go to Catalog > Products.
- Click Import Products.
- Click Choose file and select the CSV file from your computer.
- Select the delimiter used in your file (comma, semicolon, or tabulation).
- Select the character encoding used in your file:
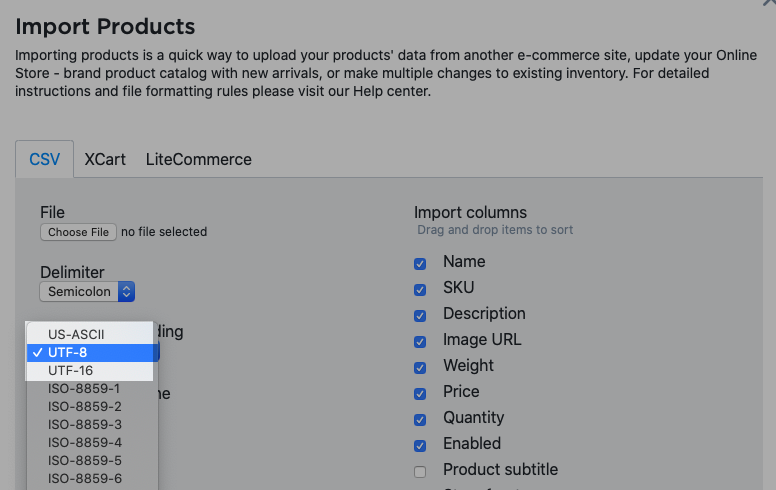
- Arrange columns (drag and drop) to mimic your file:
- Uncheck the columns that are not used in the file.
- Use the Skip column option to exclude up to three columns.
- Check the option Delete all products and categories before import if you want to clear the catalog before import. This will delete all the products that are in your store. They will be replaced with the products from the CSV file you import.
When your CSV file is uploaded, you’ll see a notification that your file has been imported. If the import failed, read some solutions to common problems.
CSV file format
Product import tool recognizes 30 product attributes (columns). Here is a brief description of each attribute:
| Column name in import dialog | Description | Requirement | Type | Limits |
| SKU | Product SKU | SKU or Name field is required | String | 255 symbols |
| Name | Product name | SKU or Name field is required | String | 255 symbols |
| Product subtitle | Product subtitle | Optional | String | 128 symbols |
| Ribbon | Product ribbon text | Optional | String | 30 symbols |
| Ribbon color | Product ribbon color | Optional | String | 7 symbols |
| Description | Product description | Optional | String | No |
| Enabled | Product availability (enabled/disabled) | Optional | Boolean | “true”, “yes”, “on”, “Y”, “1” for enabled, any other values for disabled |
| Weight | Product weight | Optional | Floating number | Any valid floating number for weight, empty value for digital product or services |
| Price | Product price | Optional | Floating number | Any valid floating number |
| “Compare to” price (in CSV file -recommended_price) | Product sale price | Optional | Floating number | Any valid floating number |
| Quantity | Product stock quantity | Optional | Integer | Any valid integer, empty value for unlimited quantity |
| Image | URL path to main product image | Optional | String | http:// or https:// URLs |
| Category 1 | Category name or path to category (e.g.Books/Science/Biology) | Optional | String | 255 symbols |
| Category 2 | Path to the second category | Optional | String | 255 symbols |
| Category 3 | Path to the third category | Optional | String | 255 symbols |
| Store front page (in CSV file -showOnFrontpage) | Indicates that a product belongs to the store root category | Optional | Boolean | “1” for true, “0” or empty value for false |
| Fixed shipping rate (In CSV file -shipping_freight) | (Legacy) Product shipping freight value | Optional | Floating number | Any valid floating number |
| Fixed shipping rate only (in CSV file – fixed_shipping_rate_only) | (Legacy) Indicates that the product has only fixed shipping rate | Optional (legacy) | Boolean | “true”, “yes”, “on”, “Y”, “1” for true, any other values for false |
| Shipping rate type (in CSV file – shippingType) | Indicates that there is a product-specific shipping of certain type | Optional | Strings | One of these values: GLOBAL_METHODS, SELECTED_METHODS, FLAT_RATE, FREE_SHIPPING |
| Shipping markup (in CSV file -shippingMethodMarkup) | Fixed fee per item value that is added to global shipping rates (See product-specific shipping) | Optional It is used with GLOBAL_METHODS shipping rate type | Floating number | Any valid floating number |
| Flat Rate Shipping amount (in CSV file -shippingFlatRate) | Fixed rate per item value (See product-specific shipping) | Optional It is used with FLAT_RATE shipping rate type | Floating number | Any valid floating number |
| Disabled shipping methods (in CSV file -shippingDisabledMethods) | Shipping methods that are disabled for a product (See product-specific shipping) | Optional It is used with SELECTED_METHODS shipping rate type | List of strings split by | symbol | A string is *ID of a shipping method |
| Enabled shipping methods (in CSV file – shippingEnabledMethods) | Shipping methods that are enabled for a product (See product-specific shipping) | Optional It is used with SELECTED_METHODS shipping rate type | List of strings split by | symbol | A string is *ID of a shipping method |
| UPC | UPC (EAN) attribute | Optional | String | 255 symbols |
| Brand | Brand attribute | Optional | String | 255 symbols |
| Page title (in CSV file – seo_title) | SEO field, meta title tag | Optional | String | 55 symbols |
| Meta description (in CSV file -seo_description) | SEO field, meta description tag | Optional | String | 160 symbols |
| Width | Product dimension for shipping calculation | Optional | Floating number | 5 symbols |
| Height | Product dimension for shipping calculation | Optional | Floating number | 5 symbols |
| Length | Product dimension for shipping calculation | Optional | Floating number | 5 symbols |
To find the ID of the shipping method you’d like to enable/disable for a product via import, click on that shipping method name in your online store’s control panel > Shipping & Pickup and copy its ID from the browser’s address bar. Alternatively, you can set up one product manually in the required way, export it, find IDs of the shipping methods enabled/disabled for it in the downloaded CSV file and use them in your import file.
Sample CSV file
Download a sample product CSV file to use as a template for creating your own CSV files. It includes information about a sample product with comma-separated values. You can import this sample file with the following options in import dialog: 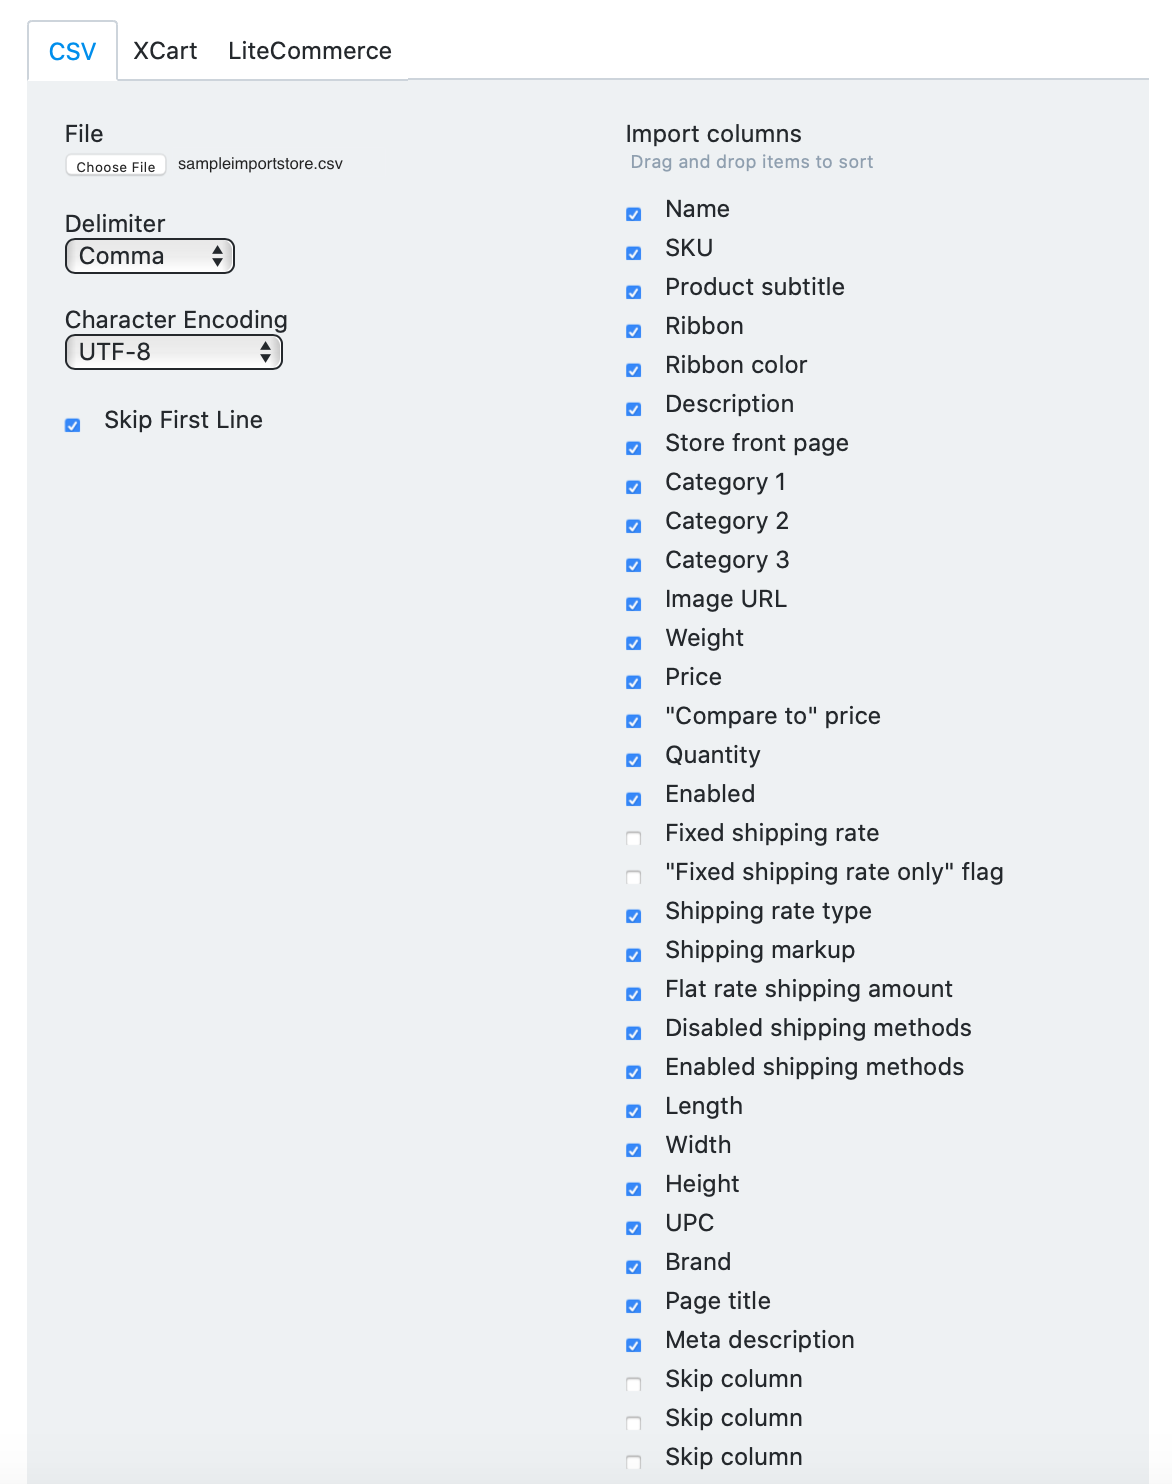
FAQ
Here’s a brief collection of the most common questions when using and importing CSV files:
How can I update my products in bulk?
If you need to change some property of many products in your store, you can use the export-import tool in your store: Step 1 – Export the products to a CSV file
- Go to your store’s Control panel > Catalog > Products.
- Use search filters to find the products that need to be updated.
- Click Export all found or Export all depending on whether you want to edit all your products or only some of them.
- In the Export products settings pop-up mark ‘Product name’, ‘SKU’ columns and the ones you want to edit (e.g. price).
- Click Download CSV file and save the resulting file on your computer.
Step 2 – Open the CSV file in a spreadsheet editor (e.g. OpenOffice Calc) and edit the columns containing the properties you want to change.
- By means of the built-in spreadsheet program features, you can quickly update many lines. For example, you can set the same value for the whole column or even apply some formula to a column so that all the values are changed in the same manner. You can insert a formula that will instantly add, subtract, multiply or divide numbers in columns or rows. For example, this way you can add a 10% price mark-up to all the products – just multiply the whole ‘price’ column by 1.1 . Please refer to your spreadsheet program’s documentation for further details on using formulas.
- Please make sure the SKU column in your editor has the ‘text’ type, when you initially open your CSV file. Sometimes, spreadsheet editors recognize numeric SKUs as integer numbers and set ‘numeric’ format for the SKU column, which results in changing their values (e.g. ‘0005’ becomes ‘5’ when considered a number). This may cause some issues during import, e.g. duplicating of store products. The SKUs in the CSV file must be imported by the spreadsheet editor exactly as you see them in online store’s control panel – setting the text format for the SKU column upon opening the file in the spreadsheet editor does the thing.
- When saving the changed file, you will most likely be prompted to change the format of the file – that is not what you want, always proceed with saving exactly to CSV format, not to Excel document or Open Document.
Step 3 – Import the edited CSV file back to store
- Go to Control panel → Catalog → Products.
- Click Import products on the top.
- In the import settings popup choose importing from CSV and open the CSV file with the Choose file button.
- Select the delimiter to be used in the exported CSV file (it is comma by default).
- In the Import columns list tick the columns that are present in your CSV file. Important: the column order must be the same as in the CSV file, please re-arrange them if needed (in order to do it you should drag-and-drop the list items).
- Important: uncheck the Delete all products/categories before import checkbox at the bottom of the window.
You cannot change the SKU for your products using import (it is a key attribute in your catalog), but you can export, edit and then import back all the other attributes/columns. It’s better to export only those columns that you want to edit (plus SKU or ‘Product name’ to identify the product). This way you will avoid dealing with extra data. For example, you can export ‘Product name’, ‘SKU’ and ‘Price’ columns and make changes in the ‘Product name’ and ‘Price’ fields. After you import back the CSV file with these three columns, the changes will be made only to the name and price of your product. The rest of the product details will remain unchanged. Example. The Quantity import field can be used for updating your store inventory. How to do it:
- Export your products (three columns will be enough: Product name, SKU, Quantity)
- Modify the CSV file in your spreadsheet editor (change the products quantities)
- Import the file to store
The number in the Quantity column will be used to update the quantity of the product with the corresponding SKU or product name. If there is no value in the Quantity column, the Unlimited quantity option will be enabled for the product. Example of a CSV file:
name;sku;quantity
cherry;item132;2
cucumber;item7;
apple;item7635;15
Can I import product options?
You can use the X-Cart or LiteCommerce import to add or update product options in batch from a CSV file (it is compatible with spreadsheets). The X-Cart import supports two types of product options: drop-down list and text field. LiteCommerce import allows to add drop-downs, text fields, text areas and radio button options in bulk.
Can I import product variations?
You can’t create new variations using import, however you can update existing variations if they have unique SKUs. To do that, you need to include these variations with their SKUs in a CSV file. Then you can update their name, price, weight, etc. the same way as you update other products via import.
Can I import categories?
Yes, using this CSV import tool you can:
- Create empty new categories/subcategories
- Create both new products and new categories/subcategories for them
- Add existing products to new categories/subcategories (they will be created after import)
- Add new or existing products to existing categories/subcategories
Example 1: Let’s say you want to add a list of new categories and subcategories to your store. This is how your file should look like in a spreadsheet (before you save it as CSV file for a further import): 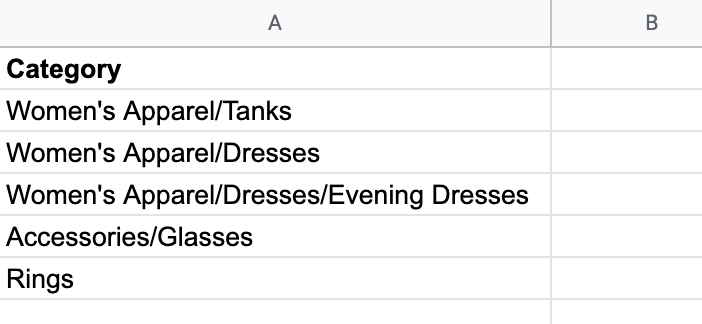 After you save your file as CSV, open import dialog and tick Category 1 (as you have one column):
  Then press Import. After the import is complete, you will have all the new categories and subcategories from the file created in your store. All the necessary categories/subcategories from the category “path” are created as well. For example, if you haven’t had a category named Women’s Apparel/Tanks in your store, then, after you import a file with a path Women’s Apparel/Tanks, you will have both the Women’s Apparel category and its Tanks subcategory created. Example 2: Let’s say you want to add a new product named Black Dress with SKU 0000 and simultaneously create two new subcategories for it: Women’s Apparel/Dresses and Women’s Apparel/Dresses/Evening Dresses. This is how your file should look like in a spreadsheet (before you save it as CSV file for a further import):
  After you save this file as CSV, open import dialog and tick Name, SKU, Category 1 and Category 2 boxes:
 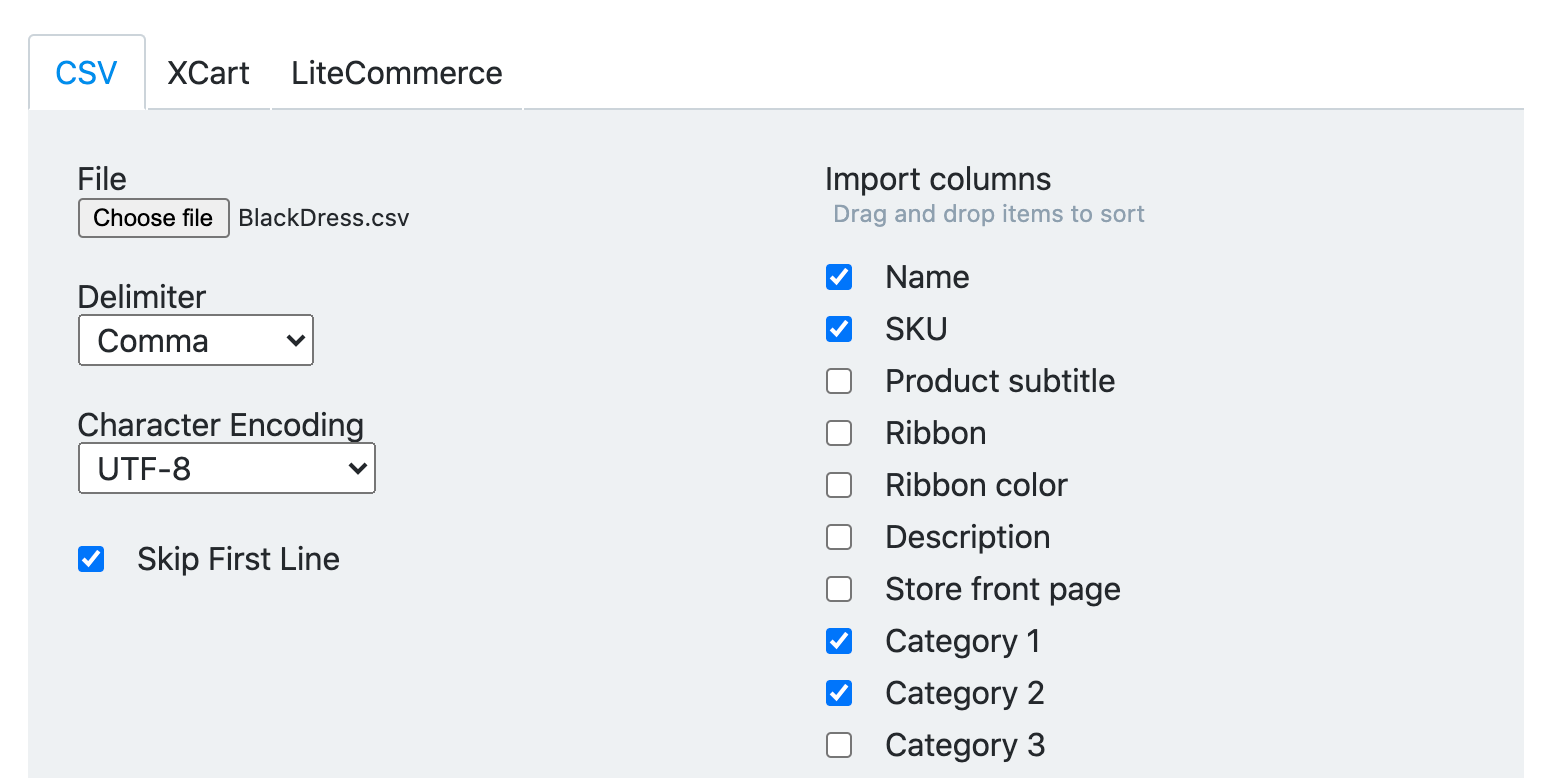 Make sure there is a tick in the Skip First Line box. Otherwise you will have categories named Category1 and Category2 (and Category3 if you used three categories/subcategories in your import) created as well, along with an extra Name SKU product. After you press Import, you will have a new product named Black Dress with SKU 0000 created in your store. You will also have two new subcategories: Women’s Apparel/Dresses and Women’s Apparel/Dresses/Evening Dresses – that will both contain this product. You can also import product categories using X-Сart format or LiteCommerce import format.
Can I upload gallery images in bulk?
You can upload gallery images in bulk with the help of the Bulk Gallery Upload application. The app allows to upload images in a single ZIP-archive.
What is “Skip column” for?
The Skip column option is an import setting used to indicate columns in your CSV file that should be ignored during import. This is useful when your CSV file contains information store does not support. You can skip up to three columns in your CSV with this option.
How to mark a product as requiring shipping?
If you have products that require shipping, you can mark them as those during import. To do it enter their weight in the Weight column in your CSV file. If the weight is not important, you can enter zero, this will make the product as requiring shipping as well.